Author Topic: Echo Dot Integration 2018  (Read 9642 times)

0 Members and 3 Guests are viewing this topic.

rablack97

  • $upporter
  • Sr. Member
  • *****
  • Posts: 100
  • Karma: 0
    • View Profile
Echo Dot Integration 2018
« on: October 05, 2018, 04:48:07 PM »
Warning: To make this work, you need to enable port forwarding on your router. Depending on your security setting this could be a safety risk! At least everyone who knows your IP and port will have access to VC! 

Note: During the installation, you will need to register for an Amazon Web Services account, which is free but requires a Credit Card.

If you still want to try it, follow the instructions below:

1. Choose a free port on your computer and write it down.  It will be used in several places during this process.  Example port: 41000

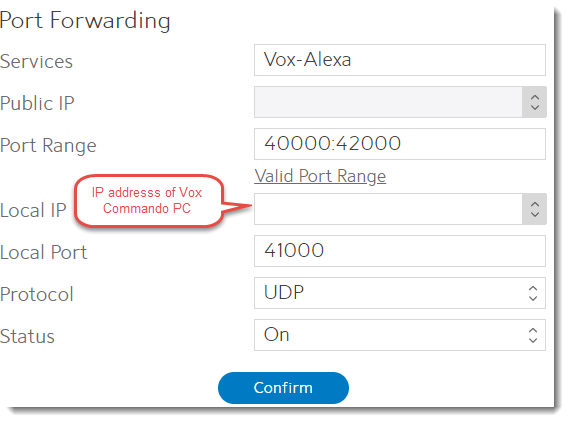
2. Set up port forwarding on your router using the port in step 1, screens may differ by router type and manufacturer.

Direct it to the internal (LAN) IP of the computer running VoxCommando that you want to send commands to using the Echo.  This is a necessary first step and the method will vary depending on your router make and model.  Refer to Google search for instructions for your specific setup.


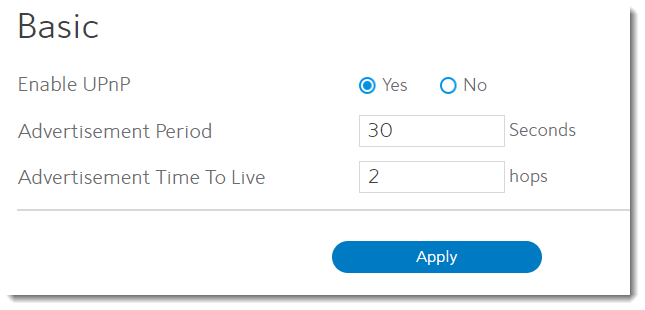
This may be optional, but make sure this is on.


3. Enable the "TCP" plugin in VoxCommando. (Do not confuse it with the TcpMic plugin.)


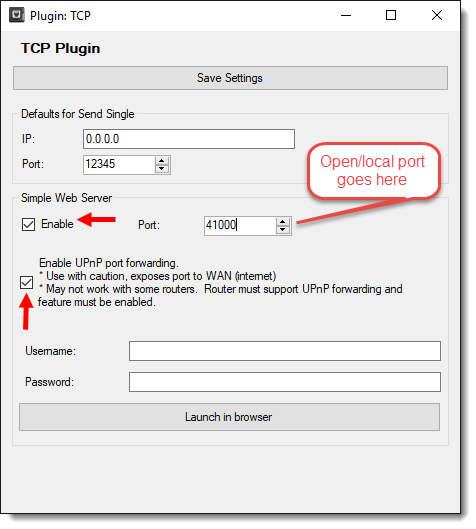
4. Open the TCP plugin settings:
  • Under “Simple Web Server” check the “Enable” box and enter the port used above.
  • VoxCommando includes an easy function to enable port forwarding on routers that support this function.

5. Click “Save Settings”, and then click “Launch in browser” to verify that it is working locally.


Optional: If possible, use a friend’s computer to test your port forwarding and TCP plugin settings by trying to access the simple web server from outside your LAN using your WAN IP address and the port above.  One way to find your WAN is to use a site like https://whatismyipaddress.com/

6. Go to the Amazon Developer Console: https://developer.amazon.com/edw/home.html#/skills/list (If you don’t already have an account, you’ll have to create one.)

7. Click

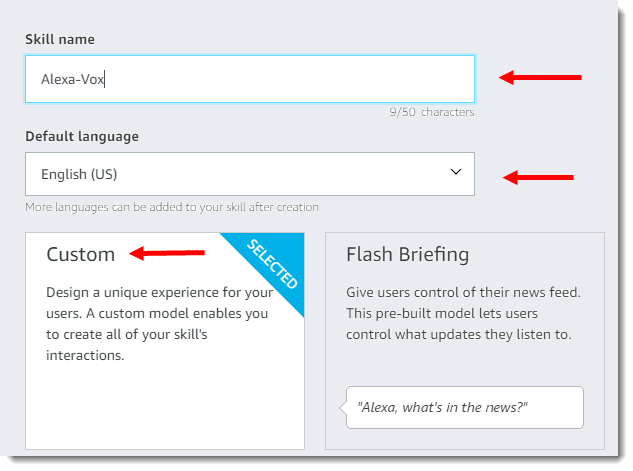
8. Fill in your skill name and make sure the Custom Skill is selected.


9. Click 

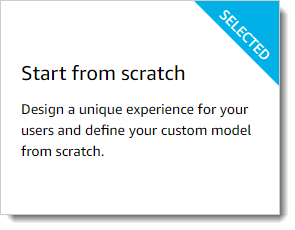
10. Make sure the Start from Scratch model is selected.


11. Click

At this point your going to follow the steps of the skill builder check list:

12. Click

13. Enter your invocation name and click

14. Click the "Build" tab to return to the Developer console 

15. Click

16. Enter "PerformAction" as the intent name no quotes and click the Create custom intent button. Note: You have to use/spell the intent name as shown or the skill will not work.


Here is where you can get creative with the phrases that Alexa will recognize and pass through to VoxCommando, for the tutorial we will keep it simple.

17. Click on the +Add button next to Slot Types (0)
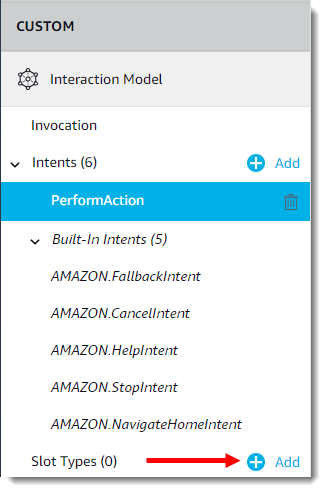


18. Type the word "COMMANDS" as the slot type name and click the Create custom slot type button. Note: You have to use/spell the slot type name as shown or the skill will not work.


Here you can and add the most common used words of your VC configuration to the list. The list does not have to be complete! Click enter after each command to add it to your list.


19. Click when you are finished.

20. Click the Performaction Intent you created earlier


21. In the Intent Slots section at the bottom type the word "Action" as the name and click the "+" symbol.


22. There will be a dot next to the word action, color will vary.  Select "COMMANDS" as the slot type.


23.In the sample utterances section type "{" you will see your Action intent slot that you created, click on the Action Icon
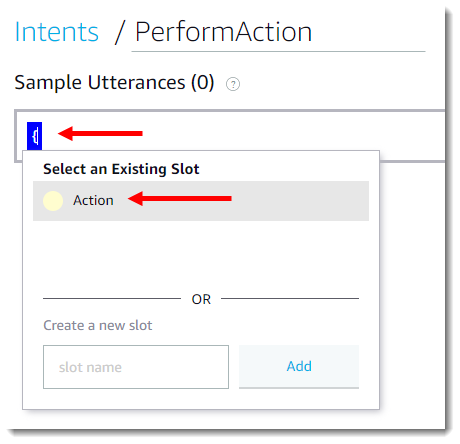


You should see this now
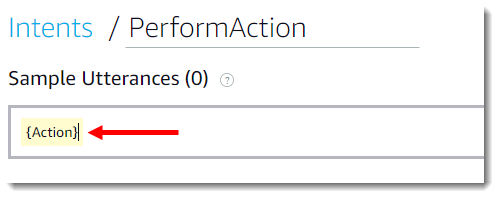


24. Hit Enter

25. Click

26. Note the ID on the top of the page that starts with: amzn1.ask.skill...  You will need to add this ID to your code later.


27. Open a new tab in your browser (keep the current page open) and go to http://aws.amazon.com/. Create an Amazon Web Services account, if you don’t already have one.

28. Log in to the console.

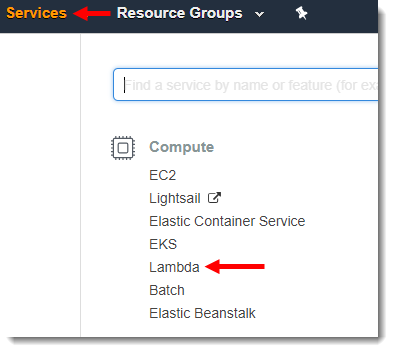
29. Navigate to Services -> Compute -> Lambda


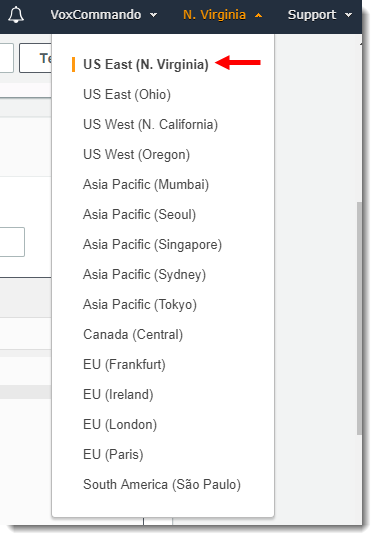
30. Click the region drop-down in the upper-right corner of the console and select either US East (N. Virginia) or EU (Ireland).


31. If you have no Lambda functions yet, click Get Started Now. Otherwise, click

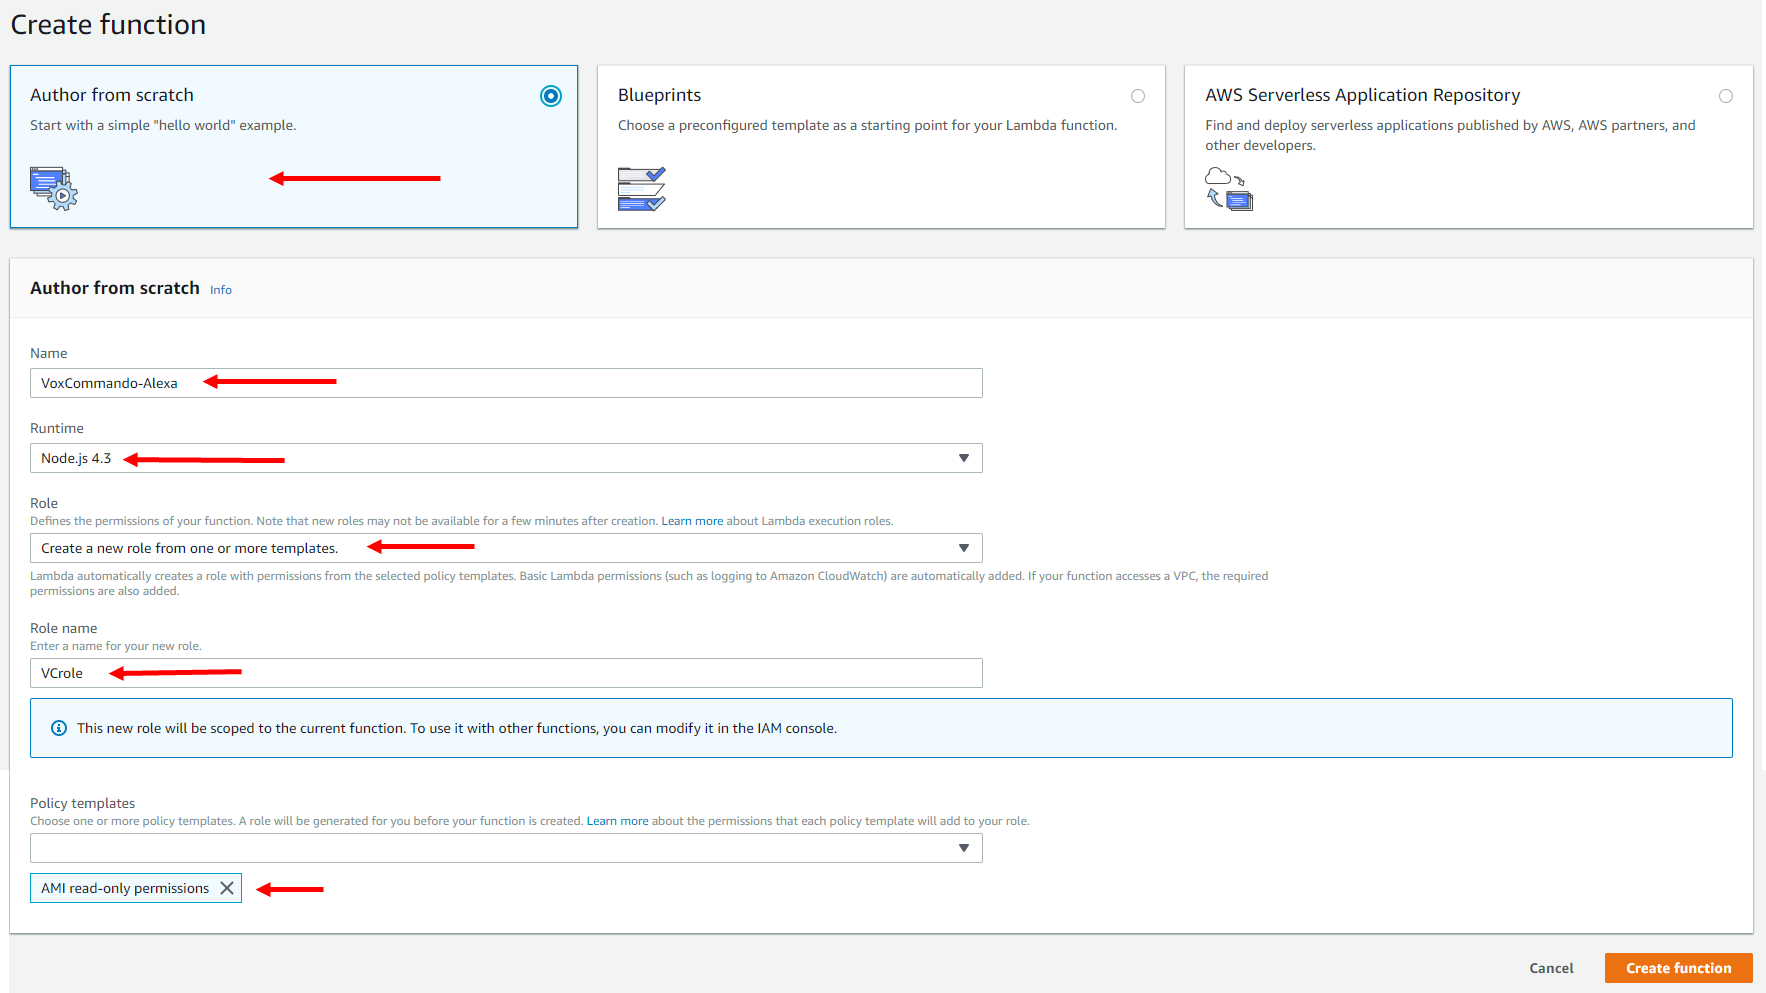
32. Author from Scratch should be selected

33. Give the function a name of your choice.

34.Runtime needs to be set to Node.js 4.3

35. Create a new role from one or more templates

36. Type VCrole in the Role Name section

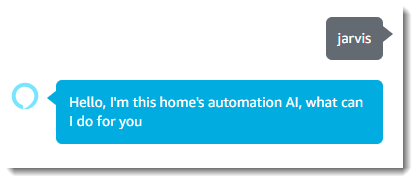
37. Choose AMI read-only permissions as the policy template.


38. Click

39. Delete everything from the codebox and paste in the following code:

Code: [Select]
//******* Pulls speech input and passes on to Voxcommando for custom events ******

var http = require('http');

var VC_ip = 'XXX.XXX.XXX.XXX';   // Add your WAN IP or DynDNS Host here
var VC_Port = '8096';         // Add the Port VC is listening to here
var VC_Event = 'EchoToVC';   // The name of the event which is created in VC
var EchoName = 'Room1';   // You can give your Echo a name here, which is transmitted as payload2 to VC. If you have more than one Echo this could
                     // be used to distinguish which Echo is sending the command to VC. To make us of this you would need to have one skill for each
                     // Echo, which unfortunately also means that each Echo needs to be assigned to a different Amazon account.
                     // Hopefully this can be replaced by the actual device name or ID at some time, but currently there is no way to do it.

var Echo_App_ID = "amzn1.ask.skill.......";  // Add your Echo App ID here

exports.handler = function (event, context) {
    try {
        if (event.session.new) {
            onSessionStarted({requestId: event.request.requestId}, event.session);
        }
        if (event.request.type === "LaunchRequest") {
            onLaunch(event.request,
                     event.session,
                     function callback(sessionAttributes, speechletResponse) {
                        context.succeed(buildResponse(sessionAttributes, speechletResponse));
                     });
        }  else if (event.request.type === "IntentRequest") {
            onIntent(event.request,
                     event.session,
                     function callback(sessionAttributes, speechletResponse) {
                         context.succeed(buildResponse(sessionAttributes, speechletResponse));
                     });
        } else if (event.request.type === "SessionEndedRequest") {
            onSessionEnded(event.request, event.session);
            context.succeed();
        }
    } catch (e) {
        context.fail("Exception: " + e);
    }
};

/**
 * Called when the session starts.
 */
function onSessionStarted(sessionStartedRequest, session) {}

/**
 * Called when the user launches the skill without specifying what they want.
 */
function onLaunch(launchRequest, session, callback) {
    // Dispatch to your skill's launch.
    getWelcomeResponse(callback);
}

/**
 * Called when the user specifies an intent for this skill.
 */
function onIntent(intentRequest, session, callback) {
    var intent = intentRequest.intent,
        intentName = intentRequest.intent.name;
    callEchoToVC(intent, session, callback);    // Whatever the Intent is, pass it straight through to VC
}

/**
 * Called when the user ends the session.
 * Is not called when the skill returns shouldEndSession=true.
 */
function onSessionEnded(sessionEndedRequest, session) {
}

// --------------- Main Intent Processing Function ----------------

function callEchoToVC(intent, session, callback)
{
    var sessionAttributes = "{}";
    var cardTitle = EchoName;
    var shouldEndSession = true;

    var payload = "";
    var speechOutput = "";
    var repromptText = "I could not understand, please try again";
    var i = 0;
    var slots = intent.slots;
   
    //Pull the spoken text and format
    var actionSlot = intent.slots.Action;
    var setAction = actionSlot.value.toLowerCase();
    var setActionURI = require('querystring').escape(setAction);

    var VC_uri = '/api/VC.TriggerEvent&&EchoToVC&&' + setActionURI + '&&' + EchoName;
    var get_options = {
        host: VC_ip,
        port: VC_Port,
        path: VC_uri
    };
 
    // Set up the request
    var get_req = http.request(get_options, function(res) {
        var VC_results = "";
        res.setEncoding('utf8');
        res.on('data', function (chunk) {
            VC_results += chunk;
        });
        res.on('end', function () {
            if (res.statusCode === 200) {
                //Parse the Body results from VC, if the command was unknow we will repromt
                if((VC_results.indexOf('intent: UNKNOWN') > -1)||(VC_results.indexOf('cmd is unknown:') > -1)) {
                     shouldEndSession=false;
                } else {
                    if(VC_results.indexOf('Return Msg: ') > -1) {
                        var lines = VC_results.split('\n');
                        for(var i = 0;i < lines.length;i++){
                            if(lines[i].indexOf('Return Msg: ') > -1) {
                                var rtn_msg = lines[i].split('Msg:')[1].trim();
                                if (rtn_msg !== '') {
                                    setAction = rtn_msg;
                                }
                            }
                        }
                    }
                }
            }
            callback(sessionAttributes,
                buildSpeechletResponse(cardTitle, speechOutput, repromptText, shouldEndSession)); //Pass stingResult instead of speechOutput for debugging if needed
        });
    });
    get_req.on('error', function (e) {
        callback(sessionAttributes,
            buildSpeechletResponse(cardTitle, speechOutput, repromptText, shouldEndSession));
    });
    get_req.end();   
}

// --------------- WelcomeResponse Function ----------------

function getWelcomeResponse(callback) {
    // If we wanted to initialize the session to have some attributes we could add those here.
    var sessionAttributes = {};
    var cardTitle = "Welcome to Echo To Voxcommando";
    var speechOutput = "Hello, I'm this home's automation AI, what can I do for you";

    // If the user either does not reply to the welcome message or says something that is not
    // understood, they will be prompted again with this text.
    var repromptText = "I could not understand, please try again";
    var shouldEndSession = false;
    callback(sessionAttributes,
             buildSpeechletResponse(cardTitle, speechOutput, repromptText, shouldEndSession));
}

// --------------- Helper Functions ----------------

function buildSpeechletResponse(title, output, repromptText, shouldEndSession) {
    return {
        outputSpeech: {
            type: "PlainText",
            text: output
        },
        card: {
            type: "Simple",
            title: "EchoToVoxcommando - " + title,
            content: output
        },
        reprompt: {
            outputSpeech: {
                type: "PlainText",
                text: repromptText
            }
        },
        shouldEndSession: shouldEndSession
    };
}

function buildResponse(sessionAttributes, speechletResponse) {
    return {
        version: "1.0",
        sessionAttributes: sessionAttributes,
        response: speechletResponse
    };
}

IMPORTANT:

Reminder: Make sure you have activated port forwarding for that port in your router settings.

40. Go to https://whatismyipaddress.com/ to get you WAN IP.

41. Make sure to add your WAN IP and the port VC is listening to the code (line 5/6). Your WAN IP will probably change. In that case you would need to get a dynamic DNS account somewhere (e.g. www.noip.com).

Optional: If you want, you can change the VC-EventName in line 7 and the name/location of your Echo in line 8.

42. Add your amzn1.ask.skill ID you noted above in line 13.

If you lost it, you can go to https://developer.amazon.com/edw/home.html#/skills/list
Edit your skill
ID will be in the URL

All red arrows are required for the skill to work:

[/img]

43. Click

44. Click "Alexa Skills Kit" from the Add triggers section
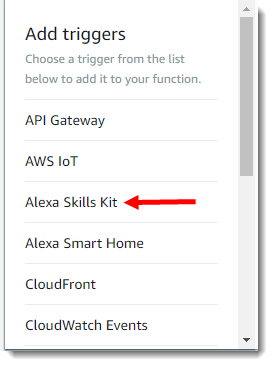


45. Add your amzn1.ask.skill ID here and click the "Add" button


46. Click

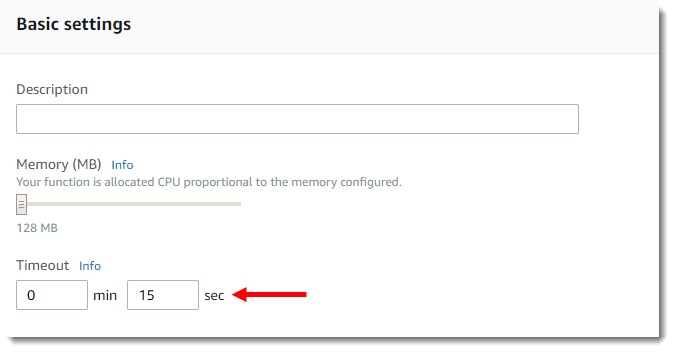
47. Under "Basic Settings" increase the timeout to 15 seconds or more, depending on how long your voice commands take to respond to the AWS service.  If you have voice commands that use TTS.SpeakSync with long phrases or if your internet connection is slow you may need to increase this even more.


48. You should now see your ARN-Number in the upper right corner of the Lamda Management Console. (Starting with ”arn:aws:lambda…”) copy the number.


49. Switch back to the browser tab with the Amazon Developer Console.

50. Click

51. Choose AWS Lambda ARN
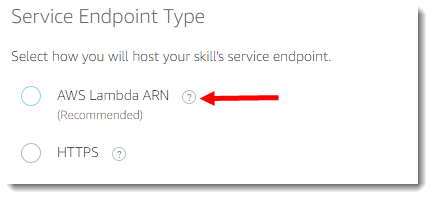


52. Paste in your ARN-Number:


53. Click

54. Click

55. Click to build your skill.

56. To check progess you can click on the Invocation Name Step and you should see a building animation at the top.


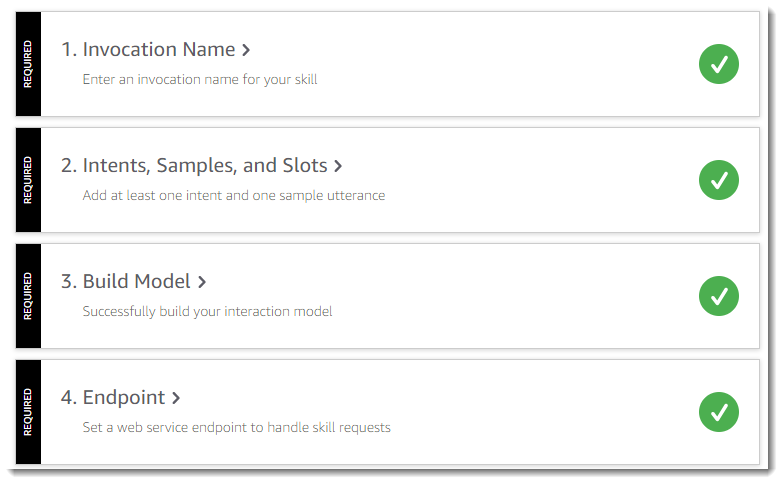
57. If all goes well all 4 checkboxes should be green


Enable your new skill in your Alexa app on your phone, search for it by name under the My Skills section.

58. You can test sending events to VoxCommando using the “Test” tab.


59. Enable the test function and type your invocation name
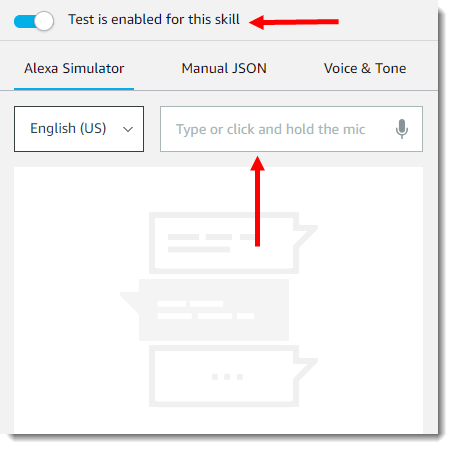


60. If it works then you will get a greeting message.
« Last Edit: October 07, 2018, 03:47:39 PM by rablack97 »

rablack97

  • $upporter
  • Sr. Member
  • *****
  • Posts: 100
  • Karma: 0
    • View Profile
Re: Echo dot integration 2018
« Reply #1 on: October 06, 2018, 03:32:31 AM »
CONTINUED....

If you now talk to your Echo and start with “Alexa tell [INVOCATION_NAME]” an event should be triggered in VC with your command as payload1 and the name/location as payload2.

Note: If you don’t want to trigger an event but instead pretend that you were speaking directly to VC, you can change line 89 of the script to: var VC_uri = '/api/VC.TellVox&&' + setActionURI; But you will then lose the name/location payload.

Note: At the moment the name/location payload can only be used, if you assign each Echo to a different Amazon Account, because all Echos of one account will have the same skills. Hopefully in the future Amazon will allow developers to get the Echo ID/name so we can make use of this feature.

An alternative is to create a command in VoxCommando that is triggered by your Echo event.  In that command you can set a variable to remember which Echo was active and then call VC.Tellvox.

If you opted to use events then you'll need to add a command to VoxCommando that will translate these events into speech emulation (recognizing with text instead of sound).

Here is XML for the sample VoxCommando command:

Code: [Select]
<?xml version="1.0" encoding="utf-16"?>
<!--VoxCommando 2.2.3.2-->
<command id="38" name="event to voice command" enabled="true" alwaysOn="False" confirm="False" requiredConfidence="0" loop="False" loopDelay="0" loopMax="0" description="">
  <action>
    <cmdType>Results.SetVar</cmdType>
    <params>
      <param>LastEcho</param>
      <param>{2}</param>
    </params>
    <cmdRepeat>1</cmdRepeat>
  </action>
  <action>
    <cmdType>VC.TellVox</cmdType>
    <params>
      <param>{1}</param>
    </params>
    <cmdRepeat>1</cmdRepeat>
  </action>
  <event>EchoToVC</event>
</command>

If you don't have an Echo device you can also test this method with echosim.io

Good Luck and Vox-On :)
« Last Edit: October 13, 2018, 08:44:41 PM by rablack97 »

jitterjames

  • Administrator
  • Hero Member
  • *****
  • Posts: 7714
  • Karma: 116
    • View Profile
    • VoxCommando
Re: Echo dot integration 2018
« Reply #2 on: October 07, 2018, 03:36:47 PM »
I'm sure it will be a huge help to a number of people. Thanks.

achel

  • Jr. Member
  • **
  • Posts: 39
  • Karma: 4
    • View Profile
Re: Echo Dot Integration 2018
« Reply #3 on: June 11, 2019, 11:06:21 AM »
Hello,

It is all setup successfully, thank you taking the time to write the guide.
When I put a username and password in Simple Web Server it obviously stops working, can I use this custom Alexa Skill with a Username and Password to get onto the Simple Web Server, or is there some limitation that doesn't allow this to happen?


Thanks in advanced,

Achel

achel

  • Jr. Member
  • **
  • Posts: 39
  • Karma: 4
    • View Profile
Re: Echo Dot Integration 2018
« Reply #4 on: June 11, 2019, 12:02:16 PM »
Hello,

I have worked out how to include authorization from the username and password defined within the Simple Web Server. The following refers to step

Quote
39. Delete everything from the codebox and paste in the following code:

Perform the following AFTER you have pasted rablack97's code in the Lambda Function.

Firstly, just before the
Code: [Select]
exports.handler = function (event, context{ line declare two new variables:
Code: [Select]
var username = 'yourUsername';
var password = 'yourPassword';
which must match the username and password you used for the Simple Web Server.

Secondly, go to this line which is around line ~90:
Code: [Select]
var get_options = {
        host: VC_ip,
        port: VC_Port,
        path: VC_uri
};
On this you want to add a new attribute called headers which will pass the username and password when sending the http request, like so:
Code: [Select]
    var get_options = {
        host: VC_ip,
        port: VC_Port,
        path: VC_uri,
            headers: {
                'Authorization': 'Basic ' + new Buffer(yourUsername + ':' + yourPassword).toString('base64')
            }

    };


Now it should work, hope this helps.

Let me know if I have done something incorrect or not suitable for VoxCommando.


Ray

  • Newbie
  • *
  • Posts: 1
  • Karma: 0
    • View Profile
Re: Echo Dot Integration 2018
« Reply #5 on: November 04, 2019, 06:12:55 AM »
Hi

Thanks for this some off the other tutorials are a bit outdated  ;D
Keep up the support much needed at times!

Ray

PegLegTV

  • $upporter
  • Sr. Member
  • *****
  • Posts: 497
  • Karma: 43
    • View Profile
Re: Echo Dot Integration 2018
« Reply #6 on: August 17, 2022, 08:11:58 PM »
hey its been a long time but being that google is doing what it does best and discontinuing services I'm trying to test out the echo skill to see if it still works and how it works. I'm hoping to replace my google/nest minis.

I was going through the tutorial above and for the most part everything was as described with some minor changes (not bad for 3 years later) how ever the big change is that node.js only allows version 12,14 or 16 and none of them fix the problem. but I cant be 100% sure that node.js is the cause. when I use the "test" tab the invocation name works

alexa voice: Hello, I'm this home's automation AI, what can I do for you
json output:

Code: [Select]
{
"body": {
"version": "1.0",
"response": {
"outputSpeech": {
"type": "PlainText",
"text": "Hello, I'm this home's automation AI, what can I do for you"
},
"card": {
"type": "Simple",
"title": "EchoToVoxcommando - Welcome to Echo To Voxcommando",
"content": "Hello, I'm this home's automation AI, what can I do for you"
},
"reprompt": {
"outputSpeech": {
"type": "PlainText",
"text": "I could not understand, please try again"
}
},
"shouldEndSession": false,
"type": "_DEFAULT_RESPONSE"
},
"sessionAttributes": {}
}
}

but after that any input I use it fails

example:
me: lights please
alex: There was a problem with the requested skill's response

no json output when it fails

through alexa app:
me: alexa tell iron man lights please
alexa voice: There was a problem with the requested skill's response
alexa app:

Code: [Select]
Skill response was marked as failure
Request identifier: amzn1.echo-api.request.........the target lambda application returned a falure response

has anyone had this issue and found how to solve it?

Kalle

  • $upporter
  • Hero Member
  • *****
  • Posts: 2320
  • Karma: 47
    • View Profile
Re: Echo Dot Integration 2018
« Reply #7 on: August 18, 2022, 02:16:23 AM »
Hi PegLeg,


I noticed the same issue and have no idea how to solve it.


Kalle
***********  get excited and make things  **********

PegLegTV

  • $upporter
  • Sr. Member
  • *****
  • Posts: 497
  • Karma: 43
    • View Profile
Re: Echo Dot Integration 2018
« Reply #8 on: August 18, 2022, 02:41:24 AM »
Hey kalle, it's been awhile.

Thanks for checking.
« Last Edit: August 18, 2022, 01:07:05 PM by PegLegTV »

Kalle

  • $upporter
  • Hero Member
  • *****
  • Posts: 2320
  • Karma: 47
    • View Profile
Re: Echo Dot Integration 2018
« Reply #9 on: August 18, 2022, 03:10:30 AM »
Yes, long time ago - maybe if James will find some time he can take a look on it.


stay tuned,


Kalle
***********  get excited and make things  **********

jitterjames

  • Administrator
  • Hero Member
  • *****
  • Posts: 7714
  • Karma: 116
    • View Profile
    • VoxCommando
Re: Echo Dot Integration 2018
« Reply #10 on: August 18, 2022, 12:44:45 PM »
I am still using Alexa with VoxCommando and it's working.  I'm a bit busy at the moment because we are selling our house and we will be away for a long weekend.

But give me a poke on Tuesday and I'll try to make some time to help you figure this out.

jitterjames

  • Administrator
  • Hero Member
  • *****
  • Posts: 7714
  • Karma: 116
    • View Profile
    • VoxCommando
Re: Echo Dot Integration 2018
« Reply #11 on: August 18, 2022, 12:57:58 PM »
Here is my lambda code.  Note that there are a bunch of environment variables that need to be set or you can just replace them with your own values directly in the code.

Look in the code for process.env.VARNAME

Code: [Select]
/*
****** Pulls speech input and passes on to Voxcommando for custom events *****
*/
var http = require('http');
var Echo_App_ID = "amzn1.ask.skill.3bee3d22-3eb3-4282-4df7-925fc8111b2e"; 

exports.handler = function (event, context) {
    try {
        if (event.session.new) {
            onSessionStarted({requestId: event.request.requestId}, event.session);
        }
        if (event.request.type === "LaunchRequest") {
            onLaunch(event.request,
                     event.session,
                     function callback(sessionAttributes, speechletResponse) {
                        context.succeed(buildResponse(sessionAttributes, speechletResponse));
                     });
        }  else if (event.request.type === "IntentRequest") {
            onIntent(event.request,
                     event.session,
                     function callback(sessionAttributes, speechletResponse) {
                         context.succeed(buildResponse(sessionAttributes, speechletResponse));
                     });
        } else if (event.request.type === "SessionEndedRequest") {
            onSessionEnded(event.request, event.session);
            context.succeed();
        }
    } catch (e) {
        context.fail("Exception: " + e);
    }
};

/**
 * Called when the session starts.
 */
function onSessionStarted(sessionStartedRequest, session) {}

/**
 * Called when the user launches the skill without specifying what they want.
 */
function onLaunch(launchRequest, session, callback) {
    // Dispatch to your skill's launch.
    getWelcomeResponse(callback);
}

/**
 * Called when the user specifies an intent for this skill.
 */
function onIntent(intentRequest, session, callback) {
    var intent = intentRequest.intent,
    intentName = intentRequest.intent.name;
    callEchoToVC(intent, session, callback); // Whatever the Intent is, pass it straight through to VC
}

/**
 * Called when the user ends the session.
 * Is not called when the skill returns shouldEndSession=true.
 */
function onSessionEnded(sessionEndedRequest, session) {
}

// --------------- Main Intent Processing Function ----------------

function callEchoToVC(intent, session, callback)
{
    var sessionAttributes = "{}";
    var cardTitle = "VoxCommando";
    var shouldEndSession = true;

    var payload = "";
    var speechOutput = "error maybe?";
    var repromptText = "...";
    var i = 0;
    var slots = intent.slots;
   
    //Pull the spoken text and format
    var actionSlot = intent.slots.Action;
    var setAction = actionSlot.value.toLowerCase();
   
    if (setAction.endsWith(" only"))
    {
        shouldEndSession=true;
        setAction = setAction.replace(" only","")
       
    }
   
    if(process.env.phrases_cancel.includes(setAction))
    {
        speechOutput ="Cancelling";
        shouldEndSession=true;
        callback(sessionAttributes, buildSpeechletResponse(cardTitle, speechOutput, repromptText, shouldEndSession));
        return;
    }
    else if (setAction.length<5)
    {
        speechOutput =process.env.tts_tooshort;
        shouldEndSession=false;
        callback(sessionAttributes, buildSpeechletResponse("Action string too short", speechOutput, repromptText, shouldEndSession));
        return;
    }
    setAction = setAction.replace("1st","first")
    .replace("2nd","second")
    .replace("3rd","third")
    .replace("4th","fourth")
    .replace("5st","fifth")
    .replace("6th","sixth")
    .replace("7th","seventh")
    .replace("8th","eighth")
    .replace("9th","nineth")
    .replace("10th","tenth")
    ;
   
    var setActionURI = require('querystring').escape(setAction);
    var VC_uri = '/api/VC.TriggerEvent&&EchoToVC&&' + setActionURI;
    var get_options = {
            host: process.env.ip,
            port: process.env.port,
            path: VC_uri
        };
    if (process.env.username !== '')
    {
        get_options = {
            host: process.env.ip,
            port: process.env.port,
            path: VC_uri,
            headers: {
                'Authorization': 'Basic ' + new Buffer.from(process.env.username + ':' + process.env.pwd).toString('base64')
            }
        };
    }
 
    // Set up the request
    var get_req = http.request(get_options, function(res) {
        var VC_results = "";
        res.setEncoding('utf8');
        res.on('data', function (chunk) {
            VC_results += chunk;
        });
       
        res.on('end', function () {
            //console.log(VC_results);
            cardTitle = VC_results;
            console.log(VC_results);
            if (res.statusCode === 200) {
                //Parse the Body results from VC, if the command was unknown we will repromt
                if(VC_results.indexOf('<Success>False') > -1) {
                    cardTitle = "Vc error: ";
                    speechOutput = "VoxCommando API error: "+setAction;
                    repromptText = "Try again or say cancel.";
                    shouldEndSession=false;
                }
                else
                {
                    var regex = /<WebResponse>([\s\S]*?)</;
                    var reMatches = VC_results.match(regex);
        if (reMatches)
        {
        var speechOutput = reMatches[1];
        }
                    else speechOutput = "I suck";
                }
            }
            callback(sessionAttributes,
                buildSpeechletResponse(cardTitle, speechOutput, repromptText, shouldEndSession)); //Pass stingResult instead of speechOutput for debugging if needed
        });
    });
    get_req.on('error', function (e) {
        shouldEndSession=true;
        callback(sessionAttributes,
            buildSpeechletResponse(cardTitle, speechOutput, repromptText, shouldEndSession));
    });
    get_req.end();   
}

// --------------- WelcomResponse Function ----------------

function getWelcomeResponse(callback) {
    // If we wanted to initialize the session to have some attributes we could add those here.
    var sessionAttributes = {};
    var cardTitle = "Welcome to Echo To Voxcommando";
    var speechOutput = "You see a smaller Jarvis in there.";

    // If the user either does not reply to the welcome message or says something that is not
    // understood, they will be prompted again with this text.
    var repromptText = "Do you speak English?";
    var shouldEndSession = false;
    callback(sessionAttributes,
             buildSpeechletResponse(cardTitle, speechOutput, repromptText, shouldEndSession));
}

// --------------- Helper Functions ----------------

function buildSpeechletResponse(title, output, repromptText, shouldEndSession) {
    return {
        outputSpeech: {
            type: "PlainText",
            text: output
        },
        card: {
            type: "Simple",
            title: "EchoToVoxcommando - " + title,
            content: output
        },
        reprompt: {
            outputSpeech: {
                type: "PlainText",
                text: repromptText
            }
        },
        shouldEndSession: shouldEndSession
    };
}

function buildResponse(sessionAttributes, speechletResponse) {
    return {
        version: "1.0",
        sessionAttributes: sessionAttributes,
        response: speechletResponse
    };
}

jitterjames

  • Administrator
  • Hero Member
  • *****
  • Posts: 7714
  • Karma: 116
    • View Profile
    • VoxCommando
Re: Echo Dot Integration 2018
« Reply #12 on: August 18, 2022, 12:58:59 PM »
Also...

Hi Pegleg.  It's nice to hear from you!  :biglaugh

jitterjames

  • Administrator
  • Hero Member
  • *****
  • Posts: 7714
  • Karma: 116
    • View Profile
    • VoxCommando
Re: Echo Dot Integration 2018
« Reply #13 on: August 18, 2022, 01:01:54 PM »
Also, I'm still using node.js version 10.  I'm not sure if I upgrade if it will keep working...

PegLegTV

  • $upporter
  • Sr. Member
  • *****
  • Posts: 497
  • Karma: 43
    • View Profile
Re: Echo Dot Integration 2018
« Reply #14 on: August 18, 2022, 01:34:17 PM »
hey jitterjames, nice to here from you too  ;D.

I'll take a look at the script and see what I can figure out.

one big change that I'm not a fan of is that the Invocation name now has to be two words, that will make commands a bit more of a mouth full... Alexa tell iron man lights please, Alexa tell iron man play random episodes of future man

please don't upgrade to test it out, I don't want to break your setup.  :bigno ::saddest

good luck with your home sale and enjoy your long weekend