Vera Configuration
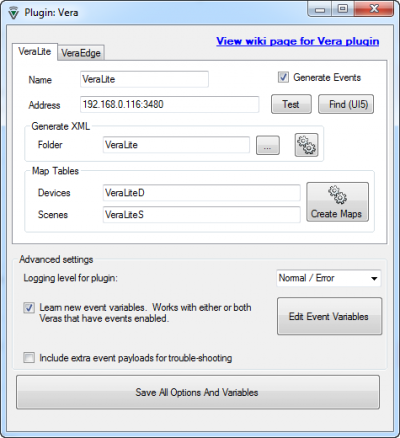
To use VoxCommando with a VeraLite, Vera Edge or Vera3 home controller you will need to activate the Vera plugin in the Plugins tab of the Options menu.
If you chose the Vera configuration when installing VoxCommando, this plugin is already enabled.
Once the plugin has been enabled, it will be listed in the plugins tab of the main VC window and also appear in the Plugins menu. This is where you can configure your Vera plugin settings.
You can now locate your Vera controller and generate payload XML as well as maps for your devices.
Contents
Plugin Settings
UI6 or UI7
If you are using UI6 or UI7 you must enter a local IP address and port number manually in the main Vera settings window.
e.g.
192.168.0.105:3480
(where 192.168.0.105 is the IP address and 3480 is the port number)
You'll need to know the IP address for your Vera controller. The port number should be 3480 or 49451.
UI5
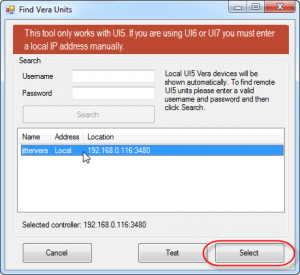
If you are blessed with UI5, you can automatically find the IP and port number for your Vera controller by clicking the "Find (UI5)" button.
You can find local or remote Vera controllers. Username and password are needed for remote Veras. Setup guidance is provided directly within the plugin settings -- just read carefully.
Any located Vera device(s) will appear, identified by name, address, and location (IP address). To connect to your Vera:
- Click on the Vera controller you want to connect to. Optionally, click on "Test" to test the connection.
- Click "Select" to choose this device.
- Close the window. VoxCommando is now in communication with this device.
Generate Events
Check this box if you wish to generate events in VoxCommando whenever a Vera device or scene changes its status. As always, these events will appear in the history panel when they occur, and can be dragged onto any command in the command tree to act as command triggers.
Be sure to save your settings.
Customizing Events
See Vera Events
Generate Payload XML
Once the plugin options have been saved, you can generate payloadXML files for your devices and scenes.
- Click the
 button to generate payloadXML files. These files will contain lists of value-phrase pairs based on your existing Vera setup, and will be saved in the \Vera folder of your main VoxCommando directory. You can then use these payloadXML files when creating your own commands.
- If your Vera device names do not feel natural as spoken phrases, you don't necessarily have to rename devices on Vera. Another option is to rename those devices directly within the payloadXML files once generated. However, if you ever need to regenerate these payload XML files (e.g., when you acquire new devices), your edits will be overwritten.
- You can also create and update map tables that associate existing device IDs and scenes with friendly names to make it easier to build commands. For a general introduction to maps and how to use them in VoxCommando, see the Introduction to Maps video tutorial.
Multiple Vera Controllers
VoxCommando currently supports a total of 2 Vera controllers. The default names provided are Vera1 and Vera2, but you can rename these. Note, however, that if you have installed the standard Vera configuration, you'll need to edit the file paths in the command tree for your payload XML files so that they point to the correctly named folders.
Commands can only be issued to one Vera controller at a time. By default, VC will connect to the controller configured in the first tab. If you want to control the second Vera controller, use the Vera plugin action Vera.SelectVera to switch between Veras.
Vera Actions
For a complete list of Vera plugin actions, see the Plugin Vera wiki page.
You can also review and select from this list of actions in the Action Selection Tree while you're building your commands.
Video Tutorial
The video refers to an earlier version of the plugin, but still provides valuable guidance on configuring the Vera plugin and editing Vera commands.

