Command Tree Editor
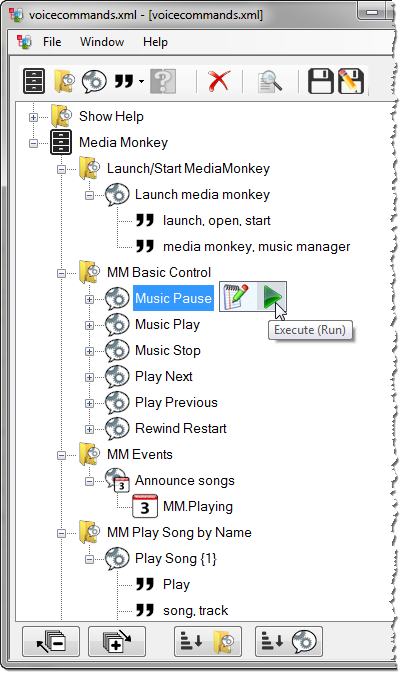
Behind the scenes, VoxCommando stores the definitions for all of our commands in an xml file (voicecommands.xml).
However, you do not need to touch that file directly. In fact, you should generally avoid it, as it's the easiest way to break your commands.
Instead, we edit commands via the Command Tree Editor.
The basic structure of the Command Tree Editor is described below. For detailed information on individual features, follow the links.
NOTE: As of VC version 2.121, the Command Tree Editor has been updated to include a higher "Collection" level in which command groups can be placed. There are also different icons. See this graphic for a detailed comparison.
Contents
Groups
![]() Groups can contain any number of commands. To create a new group, click the folder icon in the top menu.
Groups can contain any number of commands. To create a new group, click the folder icon in the top menu.
Groups can be called anything you like, and individual groups can be turned on or off.
- A greyed out group indicates that a group is disabled by default.
Note: These icons indicate the state of groups when VoxCommando first starts. They do not indicate the current state of the group at any given time. You can view the current state of command groups by selecting the "Groups" check box in the main UI to open the Groups window.
Copying Command Groups
You can copy the xml for entire groups by right-clicking on the group and selecting copy. Another way to copy the xml is to select a group and then use the Ctrl-C keyboard shortcut.
This xml can then be pasted into another window in the MDI editor, for example, or in a forum post if you're trying to share your code.
Similarly, you can copy command group xml from the forum by copying the code on the forum and pasting it into your command tree.
Commands
![]() Commands are the backbone of VoxCommando. To create a new command within a group, click the command icon in the top menu.
Commands are the backbone of VoxCommando. To create a new command within a group, click the command icon in the top menu.
When you say something such as, "Computer, play me some jazz," this corresponds to one command in the tree builder, but commands can be made up of many parts.
These parts may include:
- Phrases
- Payloads
- Events
Note that you should generally avoid creating voice commands that use only payloads. Voice commands function more reliably when they include at least one regular phrase element. Only VC versions 2.1.5.0 and later support voice commands triggered by payloads without regular phrases.
Double-cick on the command to open the Logical Command Builder, where you define what the command actually does (i.e., the "macro").
Copying Commands
You can copy the xml for a given command by right-clicking on the command and selecting "copy" (Ctrl-C also works). The command can then be pasted into another group, into another window in the MDI editor, or even directly in a forum post if you want to share your code with others.
Similarly, you can copy command xml from the forum by copying the xml in the code box and then pasting it into a command group in your command tree.
Command Editor Menu
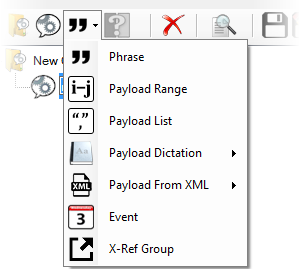
The parts of the command that appear below the command name in the tree constitute the "sentence structure" of the command. Parts can be added to a command by selecting them from the Command Part menu option:
Note that to access the Command Part drop-down list you will first need to select the command you want to edit in the command tree.
Delete
![]() There are several ways to delete command parts: select the command part and then click the red X icon in the top menu; press Del on your keyboard when the part is selected (if not editing its text); or, right-click on the command part to access the red X icon.
There are several ways to delete command parts: select the command part and then click the red X icon in the top menu; press Del on your keyboard when the part is selected (if not editing its text); or, right-click on the command part to access the red X icon.
Search
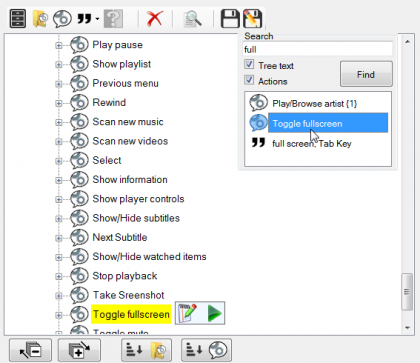
You can search the tree for specific text or actions by clicking on the search icon in the top menu. Search results will be shown directly below the search field, and simultaneously highlighted in the tree itself. Clicking on any result in the search window will take you to the corresponding command in your tree.
Phrases
![]() Phrases are the words that trigger your command. Command phrases can be created and edited in the Command Tree Editor.
Phrases are the words that trigger your command. Command phrases can be created and edited in the Command Tree Editor.
- On installation, VoxCommando is pre-configured with commands that try to use natural, intuitive phrasing. However, you can change the wording of any phrase in the program, as well as add your own phrases.
- A simple command may consist of only one phrase (such as "Listen") but may contain other elements.
- You can create a phrase list by separating your phrases with commas. VC will then listen for you to say any of the phrases in that list. In other words, the comma acts as a logical OR.
Mark phrase as optional.
- A phrase can be marked as optional. For example, you could put an optional "please" at the beginning of the command or an optional "now" at the end. Phrases marked as optional will appear italicized in the command tree. There are two ways to mark a phrase as optional:
- Click the phrase (or phrase list) to select it, then use the "Toggle Optional" icon in the top menu.
- Right-click the phrase (or phrase list) and select "Toggle Optional".
- NOTE: You should never make all phrases in your command optional.
Payloads
You can define any of four types of payloads depending on the kinds of values you want to pass:
To change a payload type or add a new payload, click on the desired payload type in the Command Part menu option ![]() (NB: The command you are editing needs to be selected in the command tree for this menu option to be accessible).
(NB: The command you are editing needs to be selected in the command tree for this menu option to be accessible).
Click here for some examples and more detailed discussion of using payloads.
Events
Events are an important part of how VoxCommando works, and therefore there is a full separate entry on events in the wiki.
In short:
Events, such as a program window opening or a remote device switching on, can be used as triggers in VoxCommando to initiate one or more commands.
- When such events occur, they appear in the "history" panel of the main window as a calendar icon.

- Events may have payloads attached that can be used in your command actions the same way that we use payloads from voice commands.
When building your own commands, you can:
- Drag events from the history panel of the main VoxCommando window into your command (a convenient way to ensure the correct syntax is used), or
- Create a custom event from scratch by selecting the event icon from the command part menu (see above) and labeling it.


