Logical Command Builder
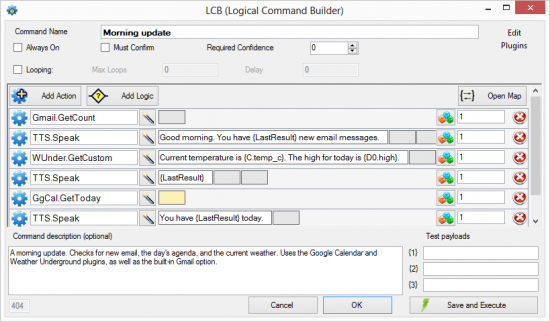
When you double-click a command in the Command Tree Editor, you access the Logical Command Builder (LCB). The LCB is where we define what happens when a certain command is executed. It is basically a macro editor.
The resulting code, once saved, will be added to your main voicecommands.xml file.
Contents
Main Command Builder Window
The command builder is essentially a macro editor that allows us to define what happens when a command is triggered.
Here are some of the elements of the builder.
| Create a new Action at the end of the command. You can drag actions to reorder them. | |
| Create a new logic block. You can't drag Logic Blocks but you can move them using the blue up and down arrows. | |
| Add a for...next loop. | |
|
Click "Open Map" to access tables of friendly names for obscure codes that you can use when editing and creating commands. VC includes maps with sample IR codes. You can also create your own. See the video tutorial Introduction to Maps to learn more. |
![]() Delete an action, or a complete logic block.
Delete an action, or a complete logic block.
![]() Click and drag on the blue gear to move actions around (Ctrl+click and drag to copy).
Click and drag on the blue gear to move actions around (Ctrl+click and drag to copy).
![]() Adds an action to "Then" or "Else" block.
Adds an action to "Then" or "Else" block.
![]() Open the Action Selection Tree window to choose from all available actions. (Note that the tree is divided into Core Actions and Plugin Actions.)
Open the Action Selection Tree window to choose from all available actions. (Note that the tree is divided into Core Actions and Plugin Actions.)
- Alternatively, you can start typing action names and an autocomplete feature will suggest options based on what you type.
- Actions are generally separated into Major and Minor actions by a period.
For example: TTS.Speak
![]() Opens the parameter helper window (where we can find the correct syntax for different parameter variables such as date types, keyboard emulation, previous command results, etc.).
Opens the parameter helper window (where we can find the correct syntax for different parameter variables such as date types, keyboard emulation, previous command results, etc.).
Command Settings
At the top of the LCB Window you will see a field and some checkboxes.
- Command Name: This is just a name for your convenience. This is what appears in the tree editor where all commands are organized.
- Always On: If this box is checked, this command will execute even when you are in standby mode, and without the need for a prefix. An obvious use for this feature is for the "Pay attention" command, but you can use it for other commands if you wish.
- Must Confirm: If this box is checked, the command will not execute right away. You will be prompted to confirm or cancel.
- For more about commands that require confirmation, please see Command Confirmation
- Required Confidence: Minimum confidence required before VC will execute your command. For this command only, this overrides the general required confidence levels specified in the Options menu's General tab.
LCB Menu
- Edit allows you to copy and paste actions between LCB windows belonging to different commands.
- The Plugins link will give you quick access to the configuration window of certain plugins if enabled, such as the Weather Underground or Hue. These plugins tend to have custom variable pickers that are useful within the LCB.
- Help. Opens this page of the wiki.
Looping
- This is distinct from the action-level for ... next loop.
If "Looping" is checked your entire command will loop according to the other parameters you set. If a command is looping, any new command will cause it to stop looping and the new command will be executed. - Max Loops: The number of times the command will repeat before automatically terminating the loop. Set this to a very large number to simulate endless looping. It is helpful to set maximum loops in case you are unable to issue another command for some reason. For a scroll command you may wish to set a Max loop of about 100. If you plan to scroll through a collection of 200 items then you might want to use a larger number.
- Delay: Specifies the time (in milliseconds) that will elapse between loop repetitions. A smaller number will result in faster looping.
Note: The looping function cannot be tested using "save and execute" or the play button. To test the looping you must save the command tree and use the appropriate trigger (i.e. your voice command or event trigger).
Testing Your Macro
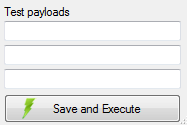
You can test a command without actually speaking the command by clicking "Save and Execute".
If your command contains actions that use payloads {1}, {2} etc. then you can enter them in the fields above the "Save and Execute" button for testing purposes.
Note, however, that if your command uses a value/phrase payloadXML file, entering a payload phrase (also known as friendly payloads) in the test fields will not work. If you want to test using phrases rather than values you will instead need to save and close the command and command tree, and then use the appropriate trigger (i.e. your voice command) to properly test the command.
Action Selection Tree 
If you click the wand icon (![]() ) you will see that the available actions are grouped in a tree (i.e., the Action Selection Tree). (Note that Core Actions and Plugin Actions are listed separately in the tree.)
) you will see that the available actions are grouped in a tree (i.e., the Action Selection Tree). (Note that Core Actions and Plugin Actions are listed separately in the tree.)
Select the action you want and click 'OK' (or double-click).
The action will be added to your Command Builder next to the wand icon that you clicked.
List of all available actions.
Using Payloads and other variables with { }
Consult the complete list of available variables.
Using Payloads
- {1} represents payload 1 (This will correspond to the first payload under your command in the command tree - assuming we don't use optional payloads)
- {2} represents payload 2 (This will correspond to the first payload under your command in the command tree - assuming we don't use optional payloads)
- and so on.
- {#P} returns the number of payloads available
- Friendly payloads give us access to the payload phrase rather than the value. These can be accessed using {PF.1} {PF.2} etc.
These payloads can also be used in the Max Loops field, and in the Repeat column of the Command Builder. It doesn't matter what kind of payload you are using, they will all be passed as text. In effect, the {#} will be replaced by your payload data.
System Variables
- {ShortDate}, {LongDate}, {ShortTime}, {LongTime}
- {CR} inserts a new line. Useful for OSD.
- {DtCustom.????} Gives you more control to access the current date time. Replace ???? with the appropriate string. For example HH returns the two-digit hour based on a 24-hour clock. See more about custom DateTime codes.
Using Results
- {LastResult} will be replaced by the text returned by your last command action. Note, however, that not all actions return a value.
Matches
Some actions return multiple results as matches, which can be accessed as follows:
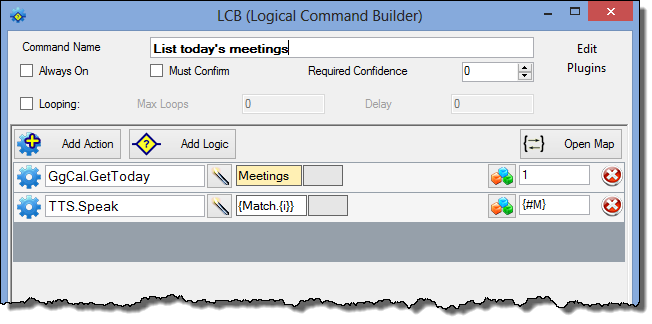
- {Match.1} {Match.2} etc. (For an example of this, see forum post on listening to Internet radio with VoxCommando).
- The number of matches found can be accessed using {#M}.
Actions That Repeat
- The repeat field (on the far right of the action) specifies how many times to perform that action. The default is 1. Set it to 0 to disable the action.
- Variables can also be used in this field (e.g., {#M}). If the value cannot be converted into a number, VoxCommando will assume a value of 1.
- Within the action we can know which iteration we are on by using {i} (and within for-next loops, we use {j}). For example:


