Show Posts

This section allows you to view all posts made by this member. Note that you can only see posts made in areas you currently have access to.


Messages - rablack97

Pages: [1] 2 3 ... 7
1
VoxCommando Basics and Core Features / Re: Echo dot integration 2018
« on: October 06, 2018, 03:32:31 AM »
CONTINUED....

If you now talk to your Echo and start with “Alexa tell [INVOCATION_NAME]” an event should be triggered in VC with your command as payload1 and the name/location as payload2.

Note: If you don’t want to trigger an event but instead pretend that you were speaking directly to VC, you can change line 89 of the script to: var VC_uri = '/api/VC.TellVox&&' + setActionURI; But you will then lose the name/location payload.

Note: At the moment the name/location payload can only be used, if you assign each Echo to a different Amazon Account, because all Echos of one account will have the same skills. Hopefully in the future Amazon will allow developers to get the Echo ID/name so we can make use of this feature.

An alternative is to create a command in VoxCommando that is triggered by your Echo event.  In that command you can set a variable to remember which Echo was active and then call VC.Tellvox.

If you opted to use events then you'll need to add a command to VoxCommando that will translate these events into speech emulation (recognizing with text instead of sound).

Here is XML for the sample VoxCommando command:

Code: [Select]
<?xml version="1.0" encoding="utf-16"?>
<!--VoxCommando 2.2.3.2-->
<command id="38" name="event to voice command" enabled="true" alwaysOn="False" confirm="False" requiredConfidence="0" loop="False" loopDelay="0" loopMax="0" description="">
  <action>
    <cmdType>Results.SetVar</cmdType>
    <params>
      <param>LastEcho</param>
      <param>{2}</param>
    </params>
    <cmdRepeat>1</cmdRepeat>
  </action>
  <action>
    <cmdType>VC.TellVox</cmdType>
    <params>
      <param>{1}</param>
    </params>
    <cmdRepeat>1</cmdRepeat>
  </action>
  <event>EchoToVC</event>
</command>

If you don't have an Echo device you can also test this method with echosim.io

Good Luck and Vox-On :)

2
VoxCommando Basics and Core Features / Echo Dot Integration 2018
« on: October 05, 2018, 04:48:07 PM »
Warning: To make this work, you need to enable port forwarding on your router. Depending on your security setting this could be a safety risk! At least everyone who knows your IP and port will have access to VC! 

Note: During the installation, you will need to register for an Amazon Web Services account, which is free but requires a Credit Card.

If you still want to try it, follow the instructions below:

1. Choose a free port on your computer and write it down.  It will be used in several places during this process.  Example port: 41000

2. Set up port forwarding on your router using the port in step 1, screens may differ by router type and manufacturer.

Direct it to the internal (LAN) IP of the computer running VoxCommando that you want to send commands to using the Echo.  This is a necessary first step and the method will vary depending on your router make and model.  Refer to Google search for instructions for your specific setup.
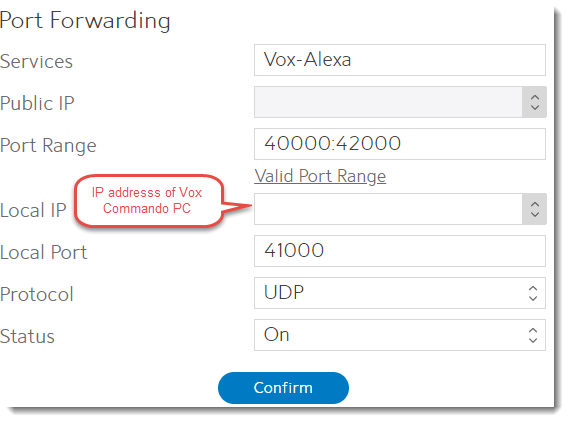


This may be optional, but make sure this is on.
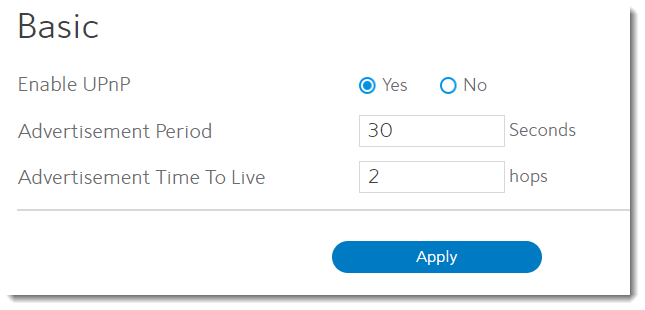


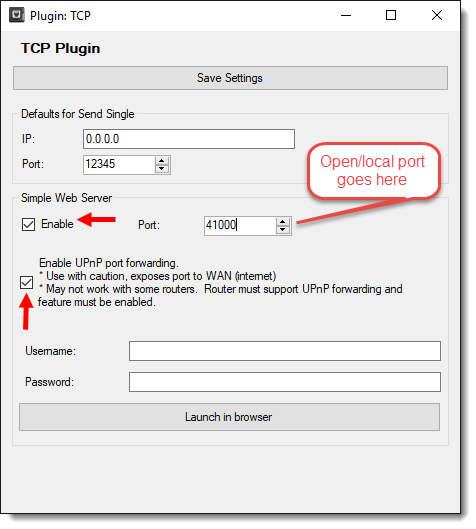
3. Enable the "TCP" plugin in VoxCommando. (Do not confuse it with the TcpMic plugin.)


4. Open the TCP plugin settings:
  • Under “Simple Web Server” check the “Enable” box and enter the port used above.
  • VoxCommando includes an easy function to enable port forwarding on routers that support this function.

5. Click “Save Settings”, and then click “Launch in browser” to verify that it is working locally.


Optional: If possible, use a friend’s computer to test your port forwarding and TCP plugin settings by trying to access the simple web server from outside your LAN using your WAN IP address and the port above.  One way to find your WAN is to use a site like https://whatismyipaddress.com/

6. Go to the Amazon Developer Console: https://developer.amazon.com/edw/home.html#/skills/list (If you don’t already have an account, you’ll have to create one.)

7. Click

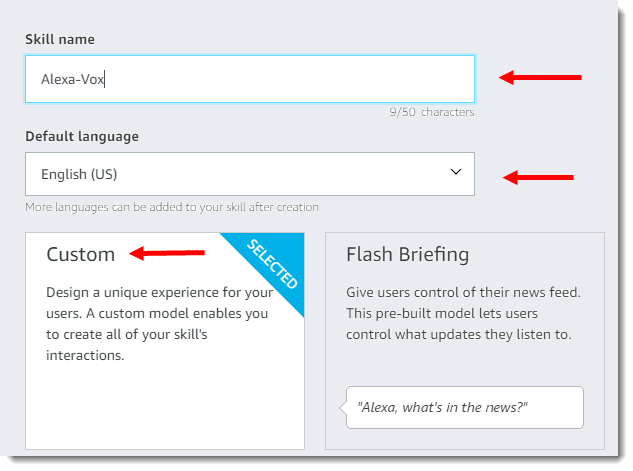
8. Fill in your skill name and make sure the Custom Skill is selected.


9. Click 

10. Make sure the Start from Scratch model is selected.
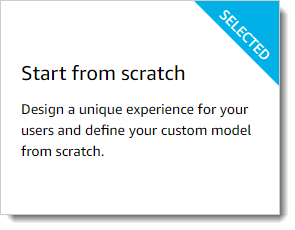


11. Click

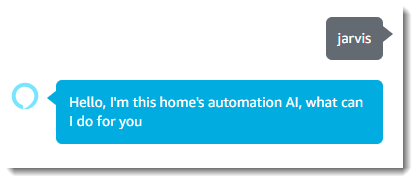
At this point your going to follow the steps of the skill builder check list:

12. Click

13. Enter your invocation name and click

14. Click the "Build" tab to return to the Developer console 

15. Click

16. Enter "PerformAction" as the intent name no quotes and click the Create custom intent button. Note: You have to use/spell the intent name as shown or the skill will not work.


Here is where you can get creative with the phrases that Alexa will recognize and pass through to VoxCommando, for the tutorial we will keep it simple.

17. Click on the +Add button next to Slot Types (0)
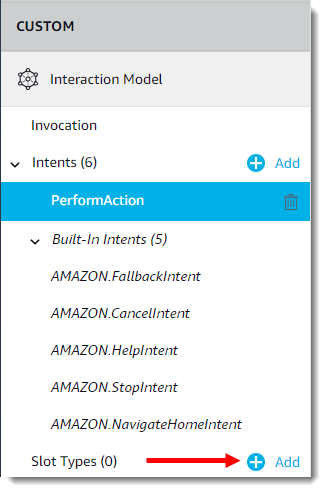


18. Type the word "COMMANDS" as the slot type name and click the Create custom slot type button. Note: You have to use/spell the slot type name as shown or the skill will not work.


Here you can and add the most common used words of your VC configuration to the list. The list does not have to be complete! Click enter after each command to add it to your list.


19. Click when you are finished.

20. Click the Performaction Intent you created earlier


21. In the Intent Slots section at the bottom type the word "Action" as the name and click the "+" symbol.


22. There will be a dot next to the word action, color will vary.  Select "COMMANDS" as the slot type.


23.In the sample utterances section type "{" you will see your Action intent slot that you created, click on the Action Icon
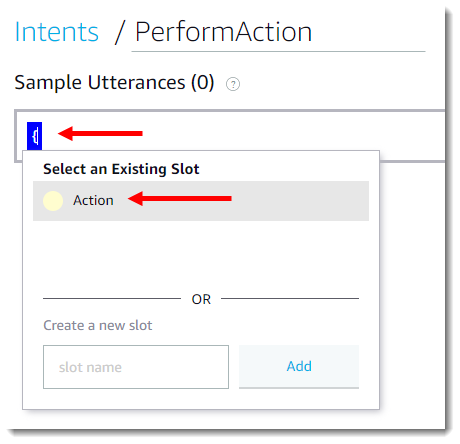


You should see this now
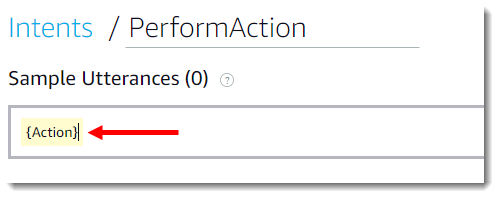


24. Hit Enter

25. Click

26. Note the ID on the top of the page that starts with: amzn1.ask.skill...  You will need to add this ID to your code later.


27. Open a new tab in your browser (keep the current page open) and go to http://aws.amazon.com/. Create an Amazon Web Services account, if you don’t already have one.

28. Log in to the console.

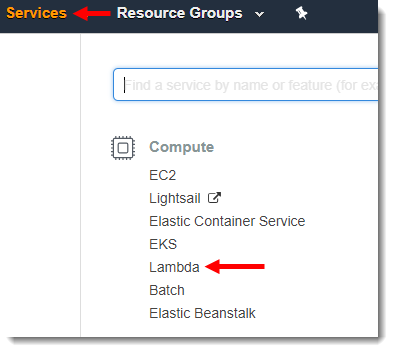
29. Navigate to Services -> Compute -> Lambda


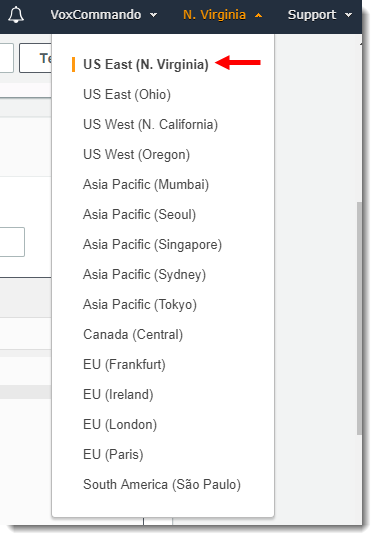
30. Click the region drop-down in the upper-right corner of the console and select either US East (N. Virginia) or EU (Ireland).


31. If you have no Lambda functions yet, click Get Started Now. Otherwise, click

32. Author from Scratch should be selected

33. Give the function a name of your choice.

34.Runtime needs to be set to Node.js 4.3

35. Create a new role from one or more templates

36. Type VCrole in the Role Name section

37. Choose AMI read-only permissions as the policy template.
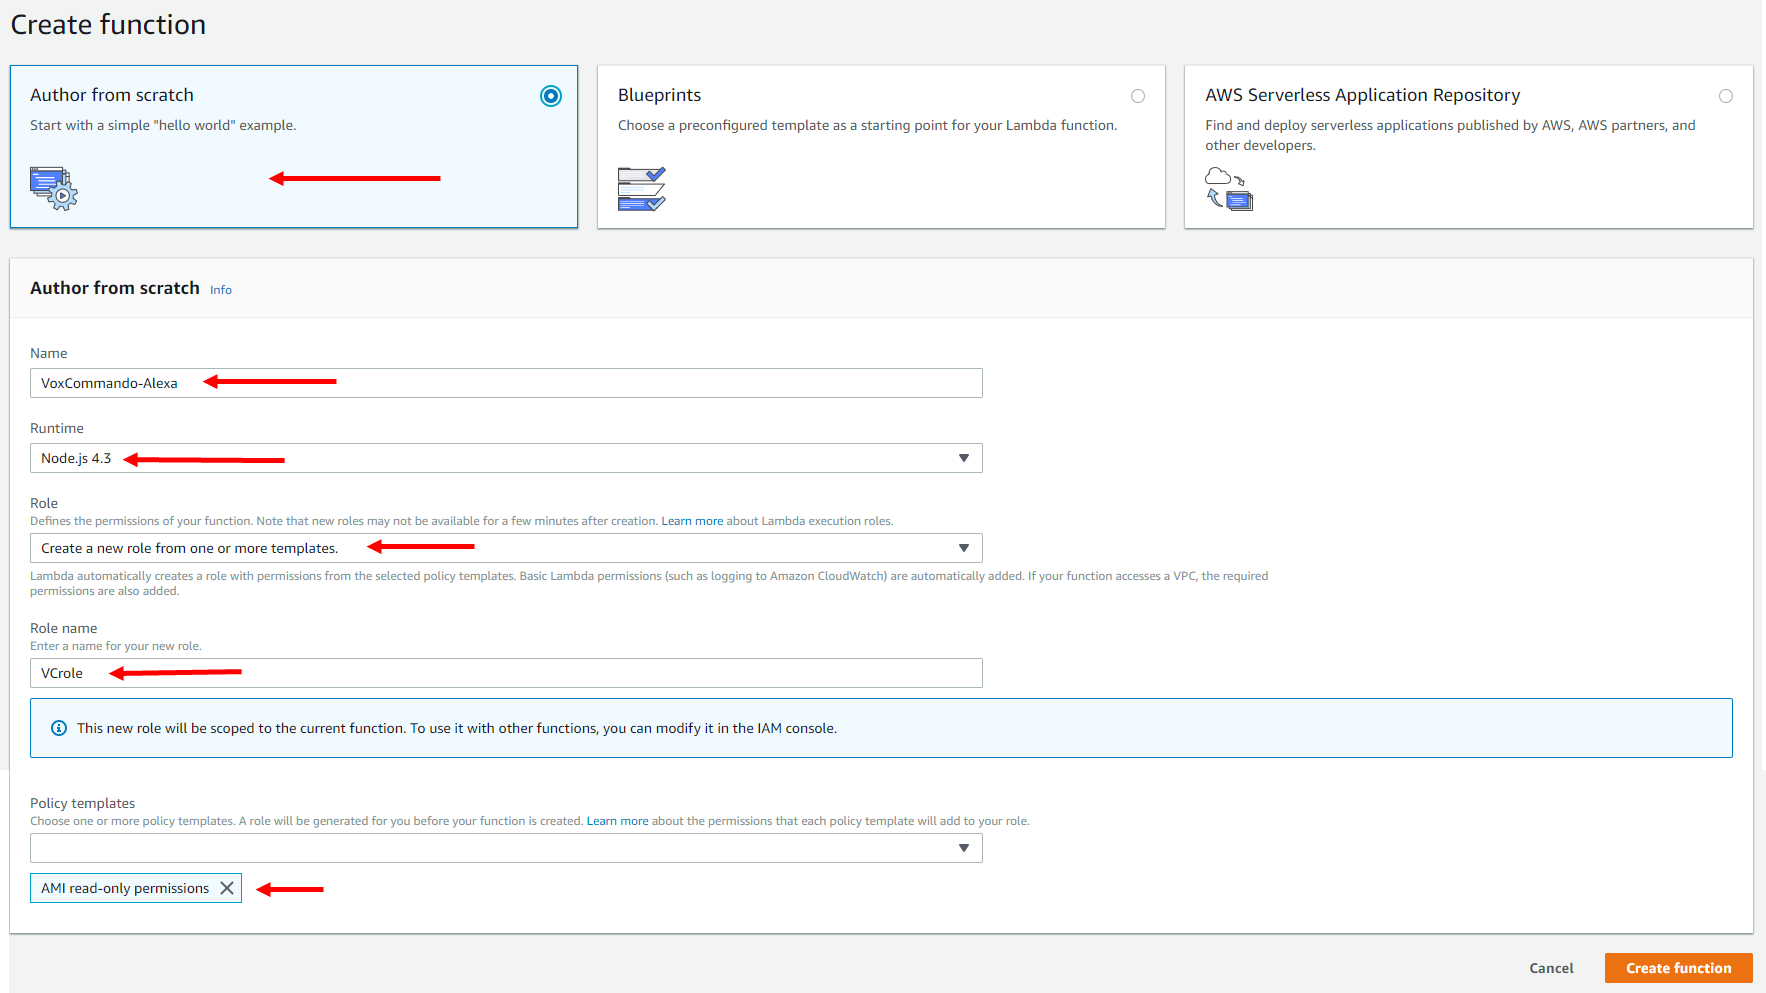


38. Click

39. Delete everything from the codebox and paste in the following code:

Code: [Select]
//******* Pulls speech input and passes on to Voxcommando for custom events ******

var http = require('http');

var VC_ip = 'XXX.XXX.XXX.XXX';   // Add your WAN IP or DynDNS Host here
var VC_Port = '8096';         // Add the Port VC is listening to here
var VC_Event = 'EchoToVC';   // The name of the event which is created in VC
var EchoName = 'Room1';   // You can give your Echo a name here, which is transmitted as payload2 to VC. If you have more than one Echo this could
                     // be used to distinguish which Echo is sending the command to VC. To make us of this you would need to have one skill for each
                     // Echo, which unfortunately also means that each Echo needs to be assigned to a different Amazon account.
                     // Hopefully this can be replaced by the actual device name or ID at some time, but currently there is no way to do it.

var Echo_App_ID = "amzn1.ask.skill.......";  // Add your Echo App ID here

exports.handler = function (event, context) {
    try {
        if (event.session.new) {
            onSessionStarted({requestId: event.request.requestId}, event.session);
        }
        if (event.request.type === "LaunchRequest") {
            onLaunch(event.request,
                     event.session,
                     function callback(sessionAttributes, speechletResponse) {
                        context.succeed(buildResponse(sessionAttributes, speechletResponse));
                     });
        }  else if (event.request.type === "IntentRequest") {
            onIntent(event.request,
                     event.session,
                     function callback(sessionAttributes, speechletResponse) {
                         context.succeed(buildResponse(sessionAttributes, speechletResponse));
                     });
        } else if (event.request.type === "SessionEndedRequest") {
            onSessionEnded(event.request, event.session);
            context.succeed();
        }
    } catch (e) {
        context.fail("Exception: " + e);
    }
};

/**
 * Called when the session starts.
 */
function onSessionStarted(sessionStartedRequest, session) {}

/**
 * Called when the user launches the skill without specifying what they want.
 */
function onLaunch(launchRequest, session, callback) {
    // Dispatch to your skill's launch.
    getWelcomeResponse(callback);
}

/**
 * Called when the user specifies an intent for this skill.
 */
function onIntent(intentRequest, session, callback) {
    var intent = intentRequest.intent,
        intentName = intentRequest.intent.name;
    callEchoToVC(intent, session, callback);    // Whatever the Intent is, pass it straight through to VC
}

/**
 * Called when the user ends the session.
 * Is not called when the skill returns shouldEndSession=true.
 */
function onSessionEnded(sessionEndedRequest, session) {
}

// --------------- Main Intent Processing Function ----------------

function callEchoToVC(intent, session, callback)
{
    var sessionAttributes = "{}";
    var cardTitle = EchoName;
    var shouldEndSession = true;

    var payload = "";
    var speechOutput = "";
    var repromptText = "I could not understand, please try again";
    var i = 0;
    var slots = intent.slots;
   
    //Pull the spoken text and format
    var actionSlot = intent.slots.Action;
    var setAction = actionSlot.value.toLowerCase();
    var setActionURI = require('querystring').escape(setAction);

    var VC_uri = '/api/VC.TriggerEvent&&EchoToVC&&' + setActionURI + '&&' + EchoName;
    var get_options = {
        host: VC_ip,
        port: VC_Port,
        path: VC_uri
    };
 
    // Set up the request
    var get_req = http.request(get_options, function(res) {
        var VC_results = "";
        res.setEncoding('utf8');
        res.on('data', function (chunk) {
            VC_results += chunk;
        });
        res.on('end', function () {
            if (res.statusCode === 200) {
                //Parse the Body results from VC, if the command was unknow we will repromt
                if((VC_results.indexOf('intent: UNKNOWN') > -1)||(VC_results.indexOf('cmd is unknown:') > -1)) {
                     shouldEndSession=false;
                } else {
                    if(VC_results.indexOf('Return Msg: ') > -1) {
                        var lines = VC_results.split('\n');
                        for(var i = 0;i < lines.length;i++){
                            if(lines[i].indexOf('Return Msg: ') > -1) {
                                var rtn_msg = lines[i].split('Msg:')[1].trim();
                                if (rtn_msg !== '') {
                                    setAction = rtn_msg;
                                }
                            }
                        }
                    }
                }
            }
            callback(sessionAttributes,
                buildSpeechletResponse(cardTitle, speechOutput, repromptText, shouldEndSession)); //Pass stingResult instead of speechOutput for debugging if needed
        });
    });
    get_req.on('error', function (e) {
        callback(sessionAttributes,
            buildSpeechletResponse(cardTitle, speechOutput, repromptText, shouldEndSession));
    });
    get_req.end();   
}

// --------------- WelcomeResponse Function ----------------

function getWelcomeResponse(callback) {
    // If we wanted to initialize the session to have some attributes we could add those here.
    var sessionAttributes = {};
    var cardTitle = "Welcome to Echo To Voxcommando";
    var speechOutput = "Hello, I'm this home's automation AI, what can I do for you";

    // If the user either does not reply to the welcome message or says something that is not
    // understood, they will be prompted again with this text.
    var repromptText = "I could not understand, please try again";
    var shouldEndSession = false;
    callback(sessionAttributes,
             buildSpeechletResponse(cardTitle, speechOutput, repromptText, shouldEndSession));
}

// --------------- Helper Functions ----------------

function buildSpeechletResponse(title, output, repromptText, shouldEndSession) {
    return {
        outputSpeech: {
            type: "PlainText",
            text: output
        },
        card: {
            type: "Simple",
            title: "EchoToVoxcommando - " + title,
            content: output
        },
        reprompt: {
            outputSpeech: {
                type: "PlainText",
                text: repromptText
            }
        },
        shouldEndSession: shouldEndSession
    };
}

function buildResponse(sessionAttributes, speechletResponse) {
    return {
        version: "1.0",
        sessionAttributes: sessionAttributes,
        response: speechletResponse
    };
}

IMPORTANT:

Reminder: Make sure you have activated port forwarding for that port in your router settings.

40. Go to https://whatismyipaddress.com/ to get you WAN IP.

41. Make sure to add your WAN IP and the port VC is listening to the code (line 5/6). Your WAN IP will probably change. In that case you would need to get a dynamic DNS account somewhere (e.g. www.noip.com).

Optional: If you want, you can change the VC-EventName in line 7 and the name/location of your Echo in line 8.

42. Add your amzn1.ask.skill ID you noted above in line 13.

If you lost it, you can go to https://developer.amazon.com/edw/home.html#/skills/list
Edit your skill
ID will be in the URL

All red arrows are required for the skill to work:

[/img]

43. Click

44. Click "Alexa Skills Kit" from the Add triggers section
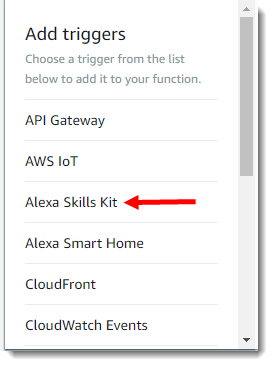


45. Add your amzn1.ask.skill ID here and click the "Add" button


46. Click

47. Under "Basic Settings" increase the timeout to 15 seconds or more, depending on how long your voice commands take to respond to the AWS service.  If you have voice commands that use TTS.SpeakSync with long phrases or if your internet connection is slow you may need to increase this even more.
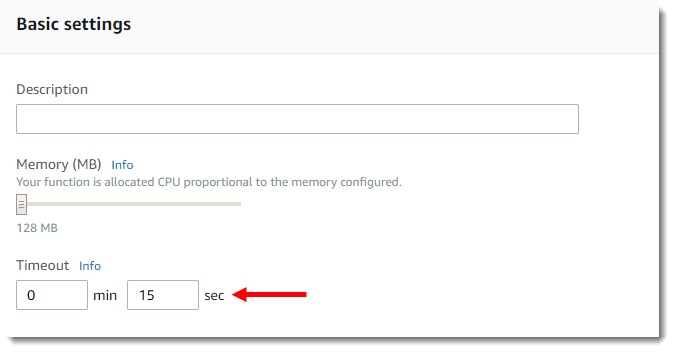


48. You should now see your ARN-Number in the upper right corner of the Lamda Management Console. (Starting with ”arn:aws:lambda…”) copy the number.


49. Switch back to the browser tab with the Amazon Developer Console.

50. Click

51. Choose AWS Lambda ARN
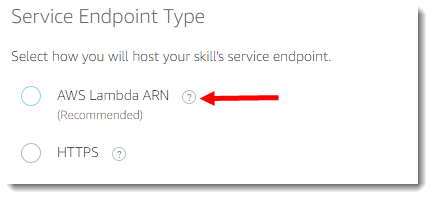


52. Paste in your ARN-Number:


53. Click

54. Click

55. Click to build your skill.

56. To check progess you can click on the Invocation Name Step and you should see a building animation at the top.


57. If all goes well all 4 checkboxes should be green
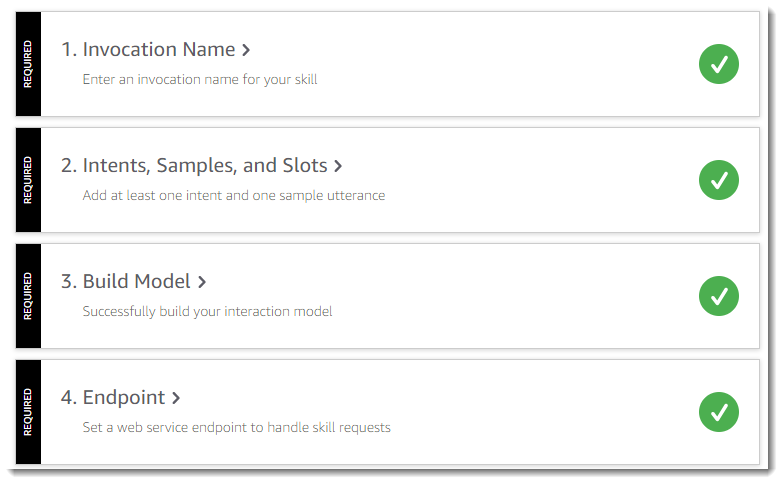


Enable your new skill in your Alexa app on your phone, search for it by name under the My Skills section.

58. You can test sending events to VoxCommando using the “Test” tab.


59. Enable the test function and type your invocation name
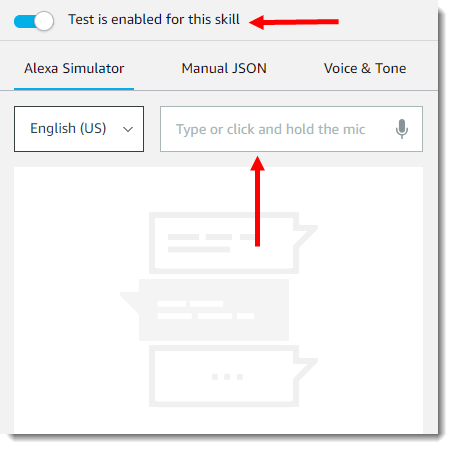


60. If it works then you will get a greeting message.

3
VoxCommando Basics and Core Features / Re: Echo dot integration
« on: October 05, 2018, 01:39:43 PM »
Yeah they made it a little bit simpler, but since i'm not a coder, had no idea why i was doing what i was doing.

But the code still works, getting 100% recognition for the commands, and i have a better idea of the use of the slots and the intents.

The slots are like a 2nd payloads variable with the intent, and there can be multiple.

So instead typing Set Volume 10 , Set volume 20 etc, you type set volume {Action}  with numeric values in the slots.

What's kinda cool is you only have to set these up for phrases alexa is having issues with.

I'll do it Kalle, as you have helped me.... ;D

I'll post the thread here as  WIP and the admins can move it to tutorials once done.

4
VoxCommando Basics and Core Features / Re: Echo dot integration
« on: October 05, 2018, 10:34:16 AM »
Ok i got it to work using the new interface.

I can redo the writeup if you want with new sceen shots if you feel its worth it.

5
VoxCommando Basics and Core Features / Re: Echo dot integration
« on: October 04, 2018, 06:00:35 PM »
ok cool thanks :)

6
VoxCommando Basics and Core Features / Echo dot integration
« on: October 04, 2018, 12:11:56 PM »
Does this still work, wanted to ask before i went through the trouble to try.

https://voxcommando.com/forum/index.php?topic=2761.0


7
Other Plugins / Re: Requesting plugin support for Pinup Popper
« on: September 26, 2018, 02:26:03 PM »
ok i have the alternate function working, and also added the launch command to launch the option selected.  TY Kalle for your suggested solution.

8
Other Plugins / Re: Requesting plugin support for Pinup Popper
« on: September 25, 2018, 02:23:57 PM »
TY so much, looking forward to testing  :)

9
Other Plugins / Re: Requesting plugin support for Pinup Popper
« on: September 25, 2018, 02:02:49 PM »
Thank you Kalle,

I will try this today.

I also tried the mapping function and this works pretty well, might be crude but it works, instead of using dictation i used an all games xml for the phrase reference and the command looks for like phrases in the mapping. If there is an easier way to display the results, please advise, mainly for informational purposes.

Didn't know if there is a way to generate/update the mapping table based on the imported XML.  I was also have a VOX friendly speech field in the popper software to reference as well as a payload xml.

Code: [Select]
<?xml version="1.0" encoding="utf-16"?>
<!--VoxCommando 2.2.4.0-->
<command id="291" name="newcommandname" enabled="true" alwaysOn="False" confirm="False" requiredConfidence="0" loop="False" loopDelay="0" loopMax="0" description="">
  <action>
    <cmdType>Map.Query</cmdType>
    <params>
      <param>select fromKey from VPTables where fromKey LIKE "%{1}%"</param>
    </params>
    <cmdRepeat>1</cmdRepeat>
  </action>
  <if ifBlockDisabled="False" ifNot="False">
    <ifType>(A)==(B)</ifType>
    <ifParams>{#M}&amp;&amp;1</ifParams>
    <then>
      <action>
        <cmdType>OSD.ShowText</cmdType>
        <params>
          <param>{Match.1}</param>
        </params>
        <cmdRepeat>1</cmdRepeat>
      </action>
      <action>
        <cmdType>TTS.Speak</cmdType>
        <params>
          <param>I found one table matching your search, {Match.1}</param>
        </params>
        <cmdRepeat>1</cmdRepeat>
      </action>
    </then>
    <else>
      <action>
        <cmdType />
        <params />
        <cmdRepeat>1</cmdRepeat>
      </action>
    </else>
  </if>
  <if ifBlockDisabled="False" ifNot="False">
    <ifType>(A)==(B)</ifType>
    <ifParams>{#M}&amp;&amp;2</ifParams>
    <then>
      <action>
        <cmdType>OSD.ShowText</cmdType>
        <params>
          <param>{Match.1}{CR}{Match.2}</param>
        </params>
        <cmdRepeat>1</cmdRepeat>
      </action>
      <action>
        <cmdType>TTS.Speak</cmdType>
        <params>
          <param>I found two tables matching your search, {Match.1} and {Match.2}</param>
        </params>
        <cmdRepeat>1</cmdRepeat>
      </action>
    </then>
    <else />
  </if>
  <if ifBlockDisabled="False" ifNot="False">
    <ifType>(A)==(B)</ifType>
    <ifParams>{#M}&amp;&amp;3</ifParams>
    <then>
      <action>
        <cmdType>OSD.ShowText</cmdType>
        <params>
          <param>{Match.1}{CR}{Match.2}{CR}{Match.3}</param>
        </params>
        <cmdRepeat>1</cmdRepeat>
      </action>
      <action>
        <cmdType>TTS.Speak</cmdType>
        <params>
          <param>I found three tables matching your search,{Match.1},{Match.2},{Match.3}</param>
        </params>
        <cmdRepeat>1</cmdRepeat>
      </action>
    </then>
    <else />
  </if>
  <if ifBlockDisabled="False" ifNot="False">
    <ifType>(A)==(B)</ifType>
    <ifParams>{#M}&amp;&amp;4</ifParams>
    <then>
      <action>
        <cmdType>OSD.ShowText</cmdType>
        <params>
          <param>{Match.1}{CR}{Match.2}{CR}{Match.3}{CR}{Match.4}</param>
        </params>
        <cmdRepeat>1</cmdRepeat>
      </action>
    </then>
    <else />
  </if>
  <phrase>Find</phrase>
  <payloadFromXML phraseOnly="True" use2partPhrase="False" phraseConnector="by" Phrase2wildcard="anyone" optional="False">\\MKX-PC\Voxcommando\vpPayloads\VPtables.xml</payloadFromXML>
</command>

There's 3 screens on my cabinet, didnt dawn on me to just move the OSD to a non-ratated screen, so that problem is solved  :bonk

Making some really positive headway, this is making the cabinet, more interactive and easier to naviagte.


10
Other Plugins / Re: Requesting plugin support for Pinup Popper
« on: September 24, 2018, 03:57:24 PM »
yep in the process of doing that now (cleaning up the game names), i'm check to see what impacts the GameName has on the software, clean that up and generate an xml off of that field, or might just ask developer to create a VoxName Field.

8 alternates is plenty.

With the advice given, i already have it doing some pretty cool stuff, i'm testing out different headsets now.

Once i get this find function down, i'll be on to scraping data from the Pinball database URL for info  :)

Is there a way to rotate the OSD?

11
Other Plugins / Re: Requesting plugin support for Pinup Popper
« on: September 24, 2018, 03:13:52 PM »
agreed on the dictation stability, i'm having to create a vox friendly list of pinball game names :)

I will look into alternates osd window as well.

TY for the tip on the VC Maps, just needed a bone.

Appreciate the teams time to look into the requests.


12
Other Plugins / Re: Requesting plugin support for Pinup Popper
« on: September 24, 2018, 01:38:53 PM »
Sorry it's not working for you. Not sure what is meant by "I can't get any results to return in the test".

You generated the payloadXML and issued a voice command successfully but it's not returning any game ID? It's not returning a valid game ID? The Scrape action is not properly launching a selected game? Something else?

Maybe you could run the command with logging enabled and post the log per standard user support requests, and also post the payloadXML you generated that you're using in the command.


No your command is working great.

I'm talking about a find function, which per James doesn't exist.

Was looking for some guidance, on how i could use the payload dictation and search through an xml and return all like results.

For example, create an all games xml, say find "batman" and have an OSD show all results LIKE Batman in a list.  Not really as an alternate command, just as a reference command.

If i have 3 batman tables the list will show all 3 titles, then i know what to say to launch it.

In your example you scraped the xml, and used Results.Regex, but when you open regex and try to view the results of the xml scrape nothing shows up, so I can't confirm if my scrape criteria is correct.

13
Other Plugins / Re: Requesting plugin support for Pinup Popper
« on: September 24, 2018, 11:23:16 AM »
any directional hints on how to do this, i'm not grasping the regex xml scrape nime5ter.  I can't get any results to return in the test.

I'm assuming you would have to create a payload xml with all of the variations?

In regards to the alternates, does the full vox commando window show up with the alternates of just a black Show.OSD screen?  I'm looking for just the Show.OSD screen, and is there a way to rotate the Show.OSD screen?

I just need a suggested command to use for the find functi, and i can run with it.  Just not sure which route to go.


14
Other Plugins / Re: Requesting plugin support for Pinup Popper
« on: September 24, 2018, 12:04:07 AM »
ok this makes sense and will work fine.

One more question.

Is there a find function, where you would say "find tron" and it scrape an all games xml and display all game names with the word tron in the OSD.  That way way you could see the different variations of the table before trying to launch the actual table.

15
Other Plugins / Re: Requesting plugin support for Pinup Popper
« on: September 22, 2018, 08:22:42 PM »
ok, only think worth pulling in the json was the game name and the emulator name.

So is it hard for vox to access the .db file directly or does it have to be with an API.

Per the developer,  "the reason i did sqllite is SO anyone could read it" , is it alot of work to have vox do the same thing, that its doing the xml generator. Return results from a query of the database and use those results in vox command?


Pages: [1] 2 3 ... 7