VoxWav Free Installation
Contents
Setting up VoxCommando on your Windows PC to communicate with VoxWav (required)
In order to use VoxWav with VoxCommando you need to enable the TcpMic plugin in VoxCommando.
It is assumed that you already have VoxCommando installed and know how to use it.
You should make sure that you have the latest version of VoxCommando installed. Version 2 or later is recommended.
Enable the TcpMic plugin
- From the main menu select Options >> "Open Options".
- Go to the "Plugins" tab.
- Place a checkmark next to TcpMic.
- Click "Save and Close".
You do not need to adjust any settings to get the plugin to connect and work.
However some settings may help improve recognition:
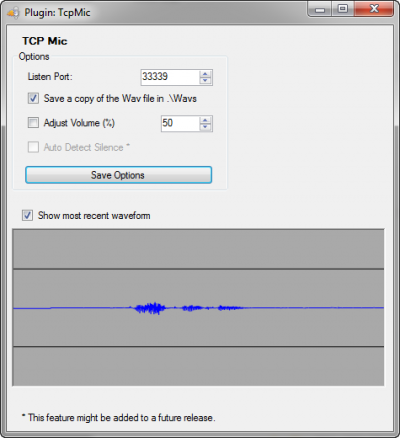
- it is often advantageous to reduce the volume to about 25% - 50%.
- make sure "Adjust Volume (%)" is checked and then enter a number from 1 to 100.
- Selecting "Show most recent waveform" and then using VoxWav to send voice commands will show an image of the waveform in the TcpMic plugin settings window. It is usually good to have a waveform that fits well within the central zone. Even if the waveform looks like it is only using about 10% to 20% of the image height, this can often result in the best recognition. Setting the input too high can result in both distortion and a tendency to pick up too much background noise.
Setting up the VoxWav App on your Android
Make sure you are using the latest version of VoxWav (Free or Pro) that is available from the Google Play store:

Install VoxWav on your Android device and launch the app. Your Android device must be connected to the same LAN (local area network) as the PC running VoxCommando. Make sure VoxCommando is running on your PC and that the plugin is enabled (see above).
Using a "hello" broadcast to find the host running VoxCommando
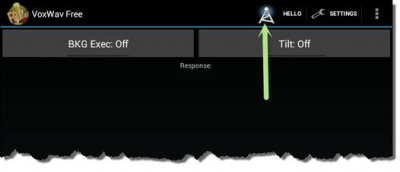
- On the main menu of VoxWav, click the radio tower icon. Depending on your device it may also say "hello" next to the icon. (On a small-screen device you may need to press the "settings" button to see the menu.)
- A window will pop up showing the addresses of any machines found that are currently running VoxCommando on the network. Select the desired IP address. (note that VoxCommando will respond to the hello request even if the TcpMic plugin is not installed and configured.
 That's it! Now you can start using VoxWav as a microphone for VoxCommando!
VoxWav Settings
Reviewing the various VoxWav settings is highly recommended.
You can customize the Settings in VoxWav and in the TcpMic plugin to improve accuracy or customize VoxWav to fit your needs.

