Installation XBMC Frodo
Rest assured that these instructions continue to apply to more recent Kodi/XBMC releases until we indicate otherwise. We may not have changed all the references in our documentation to "Kodi" instead of XBMC. Don't let that bother you.
- This is an installation guide for all versions of Kodi and XBMC 12.x FRODO or later.
- If you are newly installing VoxCommando, choose the correct preset configuration depending on which version of Kodi you are using.
- If you are using XBMC 11 Eden with VoxCommmando version 1, use the following guide: Installation XBMC Eden. VoxCommando version 2 does not provide support for Eden.
Video installation guide on Youtube
Contents
Install VoxCommando
You can follow this general guide to installing VoxCommando: Installation
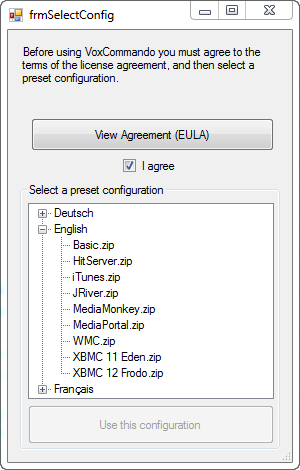
- When prompted to select a preset configuration, select the option: [YourLanguagePreference] > XMBC 12 Frodo.zip.
- (Currently VoxCommando comes packaged with English, French, and German presets).
Adjusting VoxCommando plugin settings
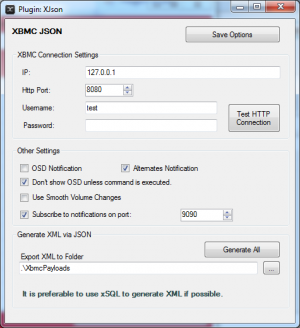
If you have selected the option "English > XMBC 12 Frodo.zip" when first running VoxCommando, then you can leave the default plugin settings for now. If you want to change the settings click the "plugins" tab on the main VoxCommando window and then double click xJson to open the plugin settings.
Configuration is done in the following VoxCommando plugins:
- xJson (required for controlling Frodo and gathering basic information about your media library)
- xSQL (optional - a better way to gather information about your media library)
- xMySql (optional - another good way to gather information about your media library if you are using a MySql database with XBMC/Kodi)
The default IP address is 127.0.0.1 (means localhost), which is OK if VoxCommando and XBMC are on the same computer. If not, you must enter the IP address of the machine running XBMC. In a LAN the IP address will usually have the form 192.169.x.x - e.g. 192.168.1.101
Note: If you are using VoxCommando version 1, there is a tab for XBMC in the Options. Ignore these options because they are only for XBMC Eden, not Frodo or later. (That tab does not appear in VC2 as Eden is no longer supported.)
Set up Kodi/XBMC to allow communication with VoxCommando
1. Go to Kodi/XBMC Network Settings
From the Home screen in Kodi using the Confluence skin:
- Navigate to System > Settings > Services
- On the UPnP / DLNA tab, set "Allow remote controlvia UPnP" (selected)
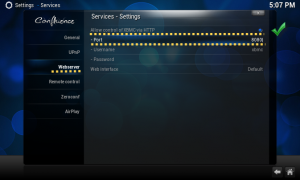
- On the Webserver tab, set the following settings
- Allow control of XBMC via HTTP : enabled
- Port: 8080
- Username: xbmc
- Password: ____ (blank)
Note: You can change the settings for port, username and password if you want, but then you need to edit the VoxCommando xJson plugin settings to match)
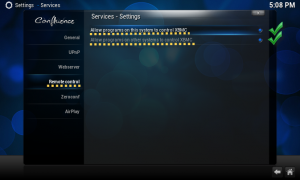
- On the Remote Control tab select both items:
- Allow remote control by programs on this system (selected)
- Allow remote control by programs on other systems (selected - if you want to run VoxCommando on a different system)
IMPORTANT: Install the VoxTools Addon for XBMC
XBMC removed certain functions that were available in the previous http control API. Specifically we need to be able to call "execbuiltin" functions for better control of XBMC. In order to get around this, we must install the VoxTools addon when using XBMC Frodo or higher.
- Go to XBMC System > Settings > Addons and choose "install from zip"
- Browse to the folder where you installed VoxCommando and select the file "repository.vc.zip"
- Select Get Addons > All Addons > Program Addons
- Install the Addon VoxTools which can now be found in the "Program" category.
- NOTE: You do not need to run the addon or configure the addon in any way. Once it is installed, the addon is good to go.
Return to general help for Installation


