Installation
Contents
Version Specific Information
VC version 2 is stable and new updates are being actively developed. If you are using version 1 of VoxCommando, please verify that you have installed version 1.191 or higher. Version 1 is no longer being developed and support for version 1 is limited.
Important note: VoxCommando version 2 requires .Net version 4.5 or later. If you only have .Net 4.0 installed, VoxCommando will run but you will have unexpected errors. Please install the latest .Net package from Microsoft.
Selecting a language
Users now have a choice of two different speech recognition platforms. For most English-speaking users, option 1 is the better choice.
1. Microsoft Desktop Engine (VoxCommando.exe):
- Generally the MS desktop speech engine is already installed if you have Windows Vista or higher, but only if you are running Windows in one of the supported languages.
2. Windows Speech Platform 11 (VoxCommandoSP.exe):
- Expanded language options have been added in VoxCommando version 2. If you want to use this alternative engine with VoxCommandoSP.exe, follow these SP11 installation instructions first. You will have to download and install the engine, as well as VoxCommando.
Installing VoxCommando
The installation guidelines below are required whether you plan to run VoxCommando.exe or VoxCommandoSP.exe.
However, there are additional steps if you plan to use VoxCommandoSP.exe, which uses a different speech recognition platform. You will first need to install Microsoft's Speech Platform 11 (free).
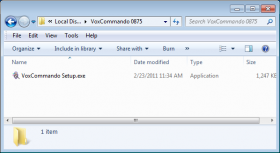
- Download the installer from the VoxCommando website.
- Save it to an empty folder.
- Run the installer (double-click or whatever makes you happy).
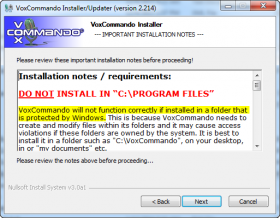
- Verify the 'Destination Folder' that files will be extracted to.
*****FOLLOW THE INSTRUCTIONS IN THE INSTALLER: DO NOT INSTALL TO PROGRAM FILES OR ANY OTHER PROTECTED DIRECTORY OR WINDOWS WILL INTERFERE WITH THE PROPER FUNCTIONING OF THE PROGRAM.******
- Click through the various installer windows.
- By default VoxCommando will be started at the end of installation. Uncheck the box if you don't wish to launch VC right away.
- You will then be offered the choice to launch the Standard program (VoxCommando.exe) or the version that uses the MS Speech Platform 11 language engine (VoxCommandoSP.exe).
- Optionally create a shortcut to VoxCommando.exe or VoxCommandoSP.exe on your desktop, or pin it to your start menu etc.
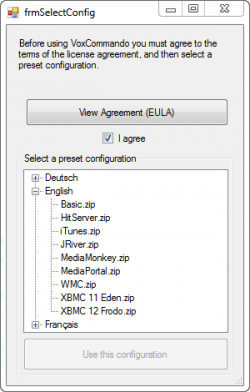
- Read the EULA (End user license agreement).
- Click 'I Agree'.
- Your first born child will now be the property of Jittersoft Inc. ;)
- Select a preset configuration from the list (note: you may switch to another configuration or make your own at a later time).
- Be careful to select the correct language.
- If using Kodi/XBMC be careful to select the correct version (Gotham, Helix) depending on which version of Kodi you are using.
- Click 'Use this configuration'.
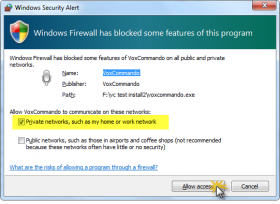
- If you are using the Windows built-in firewall you may be asked at this time if you wish to create a firewall exception. You must Allow Access since VoxCommando talks (and listens) to a number of programs (such as Kodi or web sites) through the network, even if they are running on the same computer.
- You may choose to make an exception for private networks only.
- When you first connected to your LAN on your computer, you probably selected "home" or "work" as the network type. These are considered private networks. If on the other hand, you selected "public", then you will need to create a "public" firewall exception.
Configuration
VoxCommando is now installed and ready to use. However, depending on the media application you are planning to use VoxCommando with, you may need to adjust some options to allow for proper communication between the two programs. Plugins in VoxCommando have their own settings that may need to be adjusted as well.
Each configuration comes pre-packaged with popular commands specific to that configuration (i.e., the Media Monkey configuration includes Media Monkey-related commands as well as some standard commands for controlling VoxCommando). This is simply to make your life easier. Any command can be deleted or modified to suit your preferences. New commands can always be added. See Customizing Commands for more information. You can also add commands from other configurations later.
For more information on installing specific configurations see:
iTunes
Click here for notes on the Installation iTunes.
JRiver Media Center
Click here for notes on the Installation JRiver Media Center.
MediaMonkey
Click here for notes on the Installation MediaMonkey.
Media Browser (MB3)
Click here for notes on installing MediaBrowser.
Philips Hue
Click here for notes on the Installation Philips Hue.
Vera Home Automation
Click here for notes on installing the Vera Home Automation configuration.
Kodi (XBMC)
Click here for notes on Installation Kodi.
Click here for notes on Installation XBMC.
Windows Media Center
Click here for notes on the Installation WMC.
Gathering Media Information (GenXML)
- If you want to be able to request media by name to run within a particular application, VoxCommando needs to gather information from that program to know what is in your library.
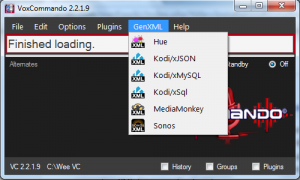
- This is done using GenXML. Click 'GenXML' on the menu at the top and then select the appropriate plugin from the list.
- A plugin may need to be enabled before genXML will work with your application.
- In most cases the program to be queried should be running before trying to generate XML. You should start the application so that VoxCommando can talk to it. In some cases (e.g. iTunes) the program will start automatically when you generate XML.
Build Missing Grammars
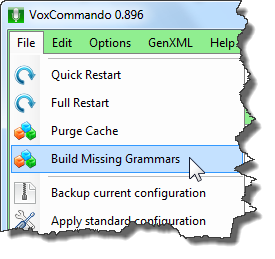
After updating your list of media with GenXML you may need to rebuild in order to load and process the new information. This way VoxCommando will know what commands and media titles to listen for.
- Note: In some rare cases it may be required to "Purge Cache" and then "Build Missing Grammars" in order to force a complete update. Depending on your media library, this can take some time.
If VoxCommando is behaving strangely, it often helps to do the following (in order) on the File Menu:
- Purge Cache
- Build Missing Grammars
- Full Restart (or manually close and then restart VC)
VoxCommando Extras
On the Downloads page, you can also download a zip file containing other programs and tools that can be used with VoxCommando. This is something to explore only once you've familiarized yourself with the core program. As of June 2013, the Extras file includes:
- AmuletUSB.exe - a small app that sits in your notification area and sends Amulet.on & Amulet.off events to VC when the Amulet is lifted or lowered. You can use these events to change modes, adjust system volume, etc. (For more on this, see the Amulet Remote support thread on the forum.)
- setDefaultPlaybackDevice.exe - sets the default Windows audio playback (output) device.
- SetSoundInput.exe - lets you choose which mic/sound input to use with VC, if not the default.
- TellVoxCommando.exe - can be used to send udp messages to VoxCommando, primarily useful for testing commands.
- udpsender.exe - if you have some other device/program that you want to communicate with VC via udp messages, it can be done using this command line utility.
- VCFileScanner.exe - generates a payload xml file with all of the file paths for a given Windows folder.
Search the forum for more guidance on these tools.
Activating a License
After you buy a license from our purchase page (using PayPal) you will be sent an activation code by email. Once you have received your activation code do the following:
- Within VoxCommando, click "Help" then click "Activate".
- Fill in the activation code and email address that was used to make your purchase via PayPal.
- Click "Activate".
- You should receive a confirmation message that activation was a success.
- Close and restart VoxCommando.
In some cases your firewall or an overactive antivirus program may interfere with the activation process. If you are unable to activate:
- First make sure you are using the correct email and activation code that was sent to you.
- Check that your firewall is not blocking VoxCommando. Make a firewall exception for VoxCommando, or disable your firewall temporarily.
- If that doesn't work you can try to temporarily disable your antivirus software.
