----------------------------------
ORIGINALLY POSTED BY DAVE
----------------------------------
----------------------------------
Hi everybody,
I recently found a script to make the Amazon Echo talk to Eventghost and was able to modify it, so it now works with VC! You can find the original thread here:
http://www.eventghost.net/forum/viewtopic.php?f=2&t=7429&sid=d3a5de9d4ca8ada8b4b36ca8a281a145 If you want to try it please be aware, that this is highly experimental!Warning: To make this work, you need to enable port forwarding on your router.
Depending on your security setting this could be a safety risk! At least everyone who knows your IP and port will have access to VC!
Recent versions of VoxCommando include an easy function to enable port forwarding on routers that support this function.
Note: During the installation, you will need to register for an Amazon Web Services account, which is free but requires a Credit Card.
If you still want to try it, follow the instructions below:1. Choose a
free port on your computer and write it down. It will be used in several places during this process. Example port: 8096
2. Set up port forwarding on your router using the port in step 1
Note: Recent versions of VoxCommando include an easy function to enable port forwarding on routers that support this function.Direct it to the internal (LAN) IP of the computer running VoxCommando that you want to send commands to using the Echo.
This is a necessary first step and the method will vary depending on your router make and model. Refer to Google search for instructions for your specific setup.
3. Enable the
TCP plugin in VoxCommando. (Do not confuse it with the TcpMic plugin.)
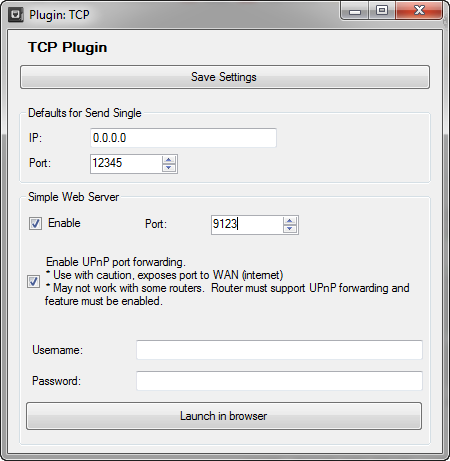
Open the TCP plugin settings
Under “Simple Web Server” check the “Enable” box and enter the port used above.
Click “Save Settings”, and then click “Launch in browser” to verify that it is working locally.
4. If possible, use a friend’s computer to test your port forwarding and TCP plugin settings by trying to access the simple web server from outside your LAN using your WAN IP address and the port above. One way to find your WAN is to use a site like
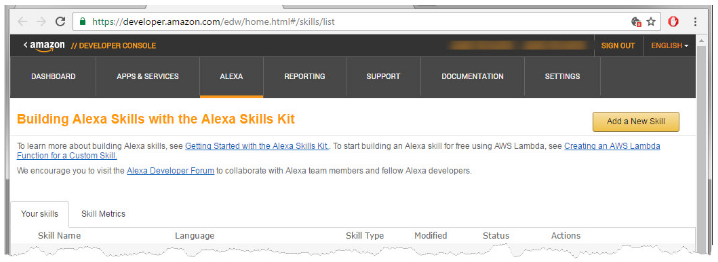
https://whatismyipaddress.com/5. Go to the Amazon Developer Console:
https://developer.amazon.com/edw/home.html#/skills/list (If you don’t already have an account, you’ll have to create one.)
Click the “Add a new skill” button top right corner.
Note: if you are not already logged in when you click the link above you will be asked to log in, and then taken to a different page from the one shown below. Click the link above again after logging in or click the “Alexa” tab and then click ”Get Started >”under “Alexa Skills Kit”.
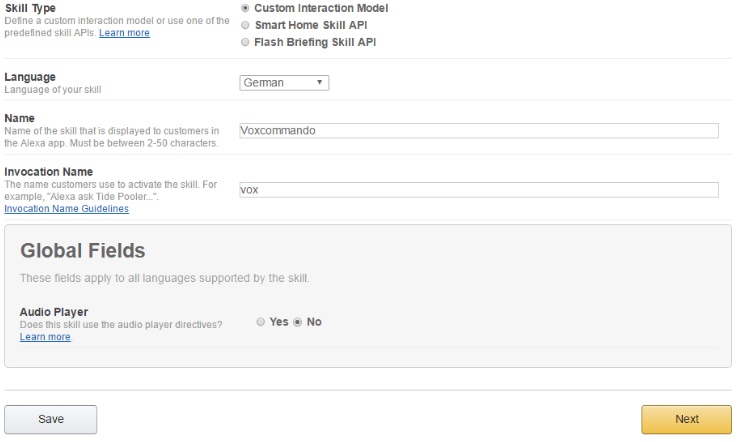
6 .Fill in the blank fields and click next:
7. Paste the following to the “Intent Schema” box:
{
"intents": [ {
"intent": "PerformAction",
"slots": [ {
"name": "Action",
"type": "COMMANDS"
} ]
} ]
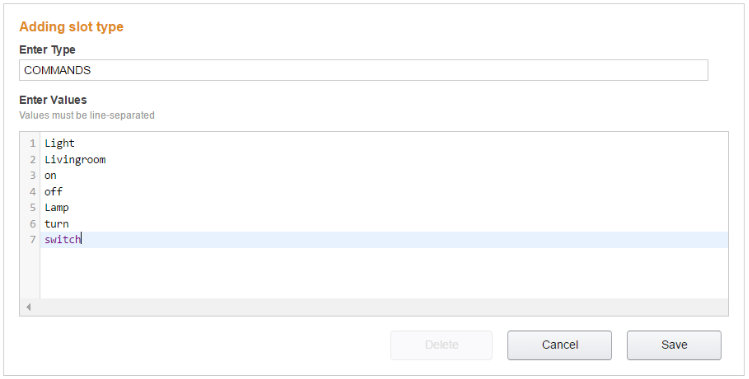
}8. Add a custom slot of TYPE “COMMANDS” and add the most common used words of your VC configuration to the list. The list does not have to be complete! Click “Save” when you are finished.
9. Paste the following to the “Sample Utterances” box and click next:
PerformAction {Action}
PerformAction {Action} {Action}
PerformAction {Action} {Action} {Action}
PerformAction {Action} {Action} {Action} {Action}
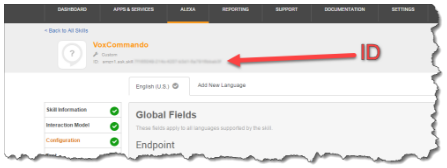
PerformAction {Action} {Action} {Action} {Action} {Action}10. Note the ID on the top of the page that starts with: amzn1.ask.skill...
You will need to add this ID to your code later.
11. Open a new tab in your browser (keep the current page open) and go to
http://aws.amazon.com/. Create an
Amazon Web Services account, if you don’t already have one.
12. Log in to the console.
13. Navigate to Services -> Compute -> Lambda
14. Click the region drop-down in the upper-right corner of the console and select either US East (N. Virginia) or EU (Ireland).
15. If you have no Lambda functions yet, click Get Started Now. Otherwise, click Create a Lambda Function.
16. Click on Blank Function.
17. When asked to configure triggers, choose
Alexa Skills Kit and click next.
18. Configuration Tab
- Give the function a name of your choice. Runtime needs to be set to
Node.js 4.3- Under "Advanced settings"
increase the timeout to 15 seconds or more, depending on how long your voice commands take to respond to the AWS service. If you have voice commands that use TTS.SpeakSync with long phrases or if your internet connection is slow you may need to increase this even more.
19. Delete everything from the codebox and paste in the following code:
/*
****** Pulls speech input and passes on to Voxcommando for custom events *****
*/
var http = require('http');

var VC_ip = 'XXX.XXX.XXX.XXX';   // Add your WAN IP or DynDNS Host here
var VC_Port = '8096';         // Add the Port VC is listening to here
var VC_Event = 'EchoToVC';   // The name of the event which is created in VC
var EchoName = 'Room1';   // You can give your Echo a name here, which is transmitted as payload2 to VC. If you have more than one Echo this could
                     // be used to distinguish which Echo is sending the command to VC. To make us of this you would need to have one skill for each
                     // Echo, which unfortunately also means that each Echo needs to be assigned to a different Amazon account.
                     // Hopefully this can be replaced by the actual device name or ID at some time, but currently there is no way to do it.

var Echo_App_ID = "amzn1.ask.skill.......";  // Add your Echo App ID here

exports.handler = function (event, context) {
    try {
        if (event.session.new) {
            onSessionStarted({requestId: event.request.requestId}, event.session);
        }
        if (event.request.type === "LaunchRequest") {
            onLaunch(event.request,
                     event.session,
                     function callback(sessionAttributes, speechletResponse) {
                        context.succeed(buildResponse(sessionAttributes, speechletResponse));
                     });
        }  else if (event.request.type === "IntentRequest") {
            onIntent(event.request,
                     event.session,
                     function callback(sessionAttributes, speechletResponse) {
                         context.succeed(buildResponse(sessionAttributes, speechletResponse));
                     });
        } else if (event.request.type === "SessionEndedRequest") {
            onSessionEnded(event.request, event.session);
            context.succeed();
        }
    } catch (e) {
        context.fail("Exception: " + e);
    }
};

/**
 * Called when the session starts.
 */
function onSessionStarted(sessionStartedRequest, session) {}

/**
 * Called when the user launches the skill without specifying what they want.
 */
function onLaunch(launchRequest, session, callback) {
    // Dispatch to your skill's launch.
    getWelcomeResponse(callback);
}

/**
 * Called when the user specifies an intent for this skill.
 */
function onIntent(intentRequest, session, callback) {
    var intent = intentRequest.intent,
        intentName = intentRequest.intent.name;
    callEchoToVC(intent, session, callback);    // Whatever the Intent is, pass it straight through to VC
}

/**
 * Called when the user ends the session.
 * Is not called when the skill returns shouldEndSession=true.
 */
function onSessionEnded(sessionEndedRequest, session) {
}

// --------------- Main Intent Processing Function ----------------

function callEchoToVC(intent, session, callback)
{
    var sessionAttributes = "{}";
    var cardTitle = EchoName;
    var shouldEndSession = true;

    var payload = "";
    var speechOutput = "";
    var repromptText = "I could not understand, please try again";
    var i = 0;
    var slots = intent.slots;

    //Pull the spoken text and format
    var actionSlot = intent.slots.Action;
    var setAction = actionSlot.value.toLowerCase();
    var setActionURI = require('querystring').escape(setAction);

    var VC_uri = '/api/VC.TriggerEvent&&EchoToVC&&' + setActionURI + '&&' + EchoName;
    var get_options = {
        host: VC_ip,
        port: VC_Port,
        path: VC_uri
    };

    // Set up the request
    var get_req = http.request(get_options, function(res) {
        var VC_results = "";
        res.setEncoding('utf8');
        res.on('data', function (chunk) {
            VC_results += chunk;
        });
        res.on('end', function () {
            if (res.statusCode === 200) {
                //Parse the Body results from VC, if the command was unknow we will repromt
                if((VC_results.indexOf('intent: UNKNOWN') > -1)||(VC_results.indexOf('cmd is unknown:') > -1)) {
                     shouldEndSession=false;
                } else {
                    if(VC_results.indexOf('Return Msg: ') > -1) {
                        var lines = VC_results.split('\n');
                        for(var i = 0;i < lines.length;i++){
                            if(lines[i].indexOf('Return Msg: ') > -1) {
                                var rtn_msg = lines[i].split('Msg:')[1].trim();
                                if (rtn_msg !== '') {
                                    setAction = rtn_msg;
                                }
                            }
                        }
                    }
                }
            }
            callback(sessionAttributes,
                buildSpeechletResponse(cardTitle, speechOutput, repromptText, shouldEndSession)); //Pass stingResult instead of speechOutput for debugging if needed
        });
    });
    get_req.on('error', function (e) {
        callback(sessionAttributes,
            buildSpeechletResponse(cardTitle, speechOutput, repromptText, shouldEndSession));
    });
    get_req.end();
}

// --------------- WelcomeResponse Function ----------------

function getWelcomeResponse(callback) {
    // If we wanted to initialize the session to have some attributes we could add those here.
    var sessionAttributes = {};
    var cardTitle = "Welcome to Echo To Voxcommando";
    var speechOutput = "Hello, I'm this home's automation AI, what can I do for you";

    // If the user either does not reply to the welcome message or says something that is not
    // understood, they will be prompted again with this text.
    var repromptText = "I could not understand, please try again";
    var shouldEndSession = false;
    callback(sessionAttributes,
             buildSpeechletResponse(cardTitle, speechOutput, repromptText, shouldEndSession));
}

// --------------- Helper Functions ----------------

function buildSpeechletResponse(title, output, repromptText, shouldEndSession) {
    return {
        outputSpeech: {
            type: "PlainText",
            text: output
        },
        card: {
            type: "Simple",
            title: "EchoToVoxcommando - " + title,
            content: output
        },
        reprompt: {
            outputSpeech: {
                type: "PlainText",
                text: repromptText
            }
        },
        shouldEndSession: shouldEndSession
    };
}

function buildResponse(sessionAttributes, speechletResponse) {
    return {
        version: "1.0",
        sessionAttributes: sessionAttributes,
        response: speechletResponse
    };
}IMPORTANT:Make sure to add your WAN IP and the port VC is listening to the code (line 6/7). Your WAN IP will probably change. In that case you would need to get a dynamic DNS account somewhere (e.g.
www.noip.com).
Also make sure you have activated port forwarding for that port in your router settings.
If you want, you can change the VC-EventName in line 8 and the name/location of your Echo in line 9.
20. Add the ID you noted above in line 13. If you lost it, you can
Go to
https://developer.amazon.com/edw/home.html#/skills/listOpen Alexa Skills Kit
Edit your skill
See the ID at the top:
21. Scroll down to Lambda function handler and role and make the following settings:
Handler: index.handler
Role: Create new role from template(s)
Role Name: VCrole
Policy templates: AMI read-only permissions
22. Leave all other settings as default and click next.
23. On the review page click on create function.
24. You should now see your ARN-Number in the upper right corner of the Lamda Management Console. (Starting with ”arn:aws:lambda…”) copy the number.
25. Switch back to the browser tab with the Amazon Developer Console.
26. Click on configuration and paste in your ARN-Number:
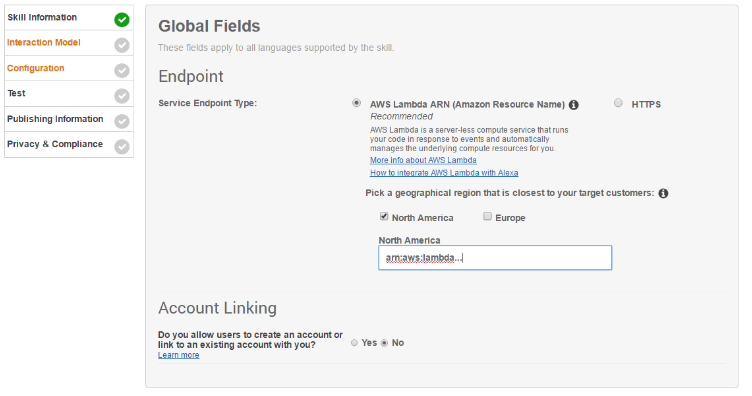
27. Click on Next.
28. You can test sending events to VoxCommando using the “Service Simulator” on the text tab.
29. You can ignore settings in the Publishing Information and Privacy & Compliance sections for now.
You're almost done!
30. You should now find the skill under “My Skills” in your Alexa App. If you now talk to your Echo and start with “Alexa tell [INVOCATION_NAME]” an event should be triggered in VC with your command as payload1 and the name/location as payload2.
Note: If you don’t want to trigger an event but instead pretend that you were speaking directly to VC, you can change line 89 of the script to: var VC_uri = '/api/VC.TellVox&&' + setActionURI;
But you will then lose the name/location payload. NOTE: At the moment the name/location payload can only be used, if you assign each Echo to a different Amazon Account, because all Echos of one account will have the same skills. Hopefully in the future Amazon will allow developers to get the Echo ID/name so we can make use of this feature.
An alternative is to create a command in VoxCommando that is triggered by your Echo event. In that command you can set a variable to remember which Echo was active and then call VC.Tellvox.
31. If you opted to use events then you'll need to add a command to VoxCommando that will translate these events into speech emulation (recognizing with text instead of sound).
Here is XML for the sample VoxCommando command:
<?xml version="1.0" encoding="utf-16"?>
<!--VoxCommando 2.2.3.2-->
<command id="38" name="event to voice command" enabled="true" alwaysOn="False" confirm="False" requiredConfidence="0" loop="False" loopDelay="0" loopMax="0" description="">
  <action>
    <cmdType>Results.SetVar</cmdType>
    <params>
      <param>LastEcho</param>
      <param>{2}</param>
    </params>
    <cmdRepeat>1</cmdRepeat>
  </action>
  <action>
    <cmdType>VC.TellVox</cmdType>
    <params>
      <param>{1}</param>
    </params>
    <cmdRepeat>1</cmdRepeat>
  </action>
  <event>EchoToVC</event>
</command>
If you don't have an Echo device you can also test this method with echosim.io
